


shoot the moon
People often ask how I shoot things like lightning, meteor showers, the moon. To be honest, it took a lot of attempts and screw ups and reading for me to manage any level of competency and I’m *still* screwing up and I’m *still* learning. But after the recent supermoon event, I thought it might be helpful to document a little of my process. The moon, unlike lightning, is something you can plan for well in advance (thank you, SCIENCE!). And unlike meteor showers, you can know exactly where it is going to be. It’s also pretty big, which makes locating it less of a mystery.
ye olde supermoon rising

When I first took interest in photographing the moon, I would see it outside, grab my camera and take some photos. I usually got bupkis, or something close to it. My moon was a teeny white dot on a sea of black night sky, usually void of any details. The nice thing about the moon is that it makes a regular appearance in the sky and the great advantage of digital is that I could burn tons of crappy images and learn from my countless mistakes relatively quickly.
here is the setup i used on the supermoon

Right now, I’m gunning for a big moon, because I have never nailed that to my satisfaction. I don’t do enough serious telephoto photography to justify dropping $8,000+ on a single lens and I don’t know that I ever will. However, I do have the option to rent these very expensive, very wonderful, very powerful telephoto lenses from my friends at Pro Photo Rental in Boulder (they ship US and Canada). You can, of course, do remarkable work with landscape captures of the moon. My mentor and friend, Michael Frye, achieves this routinely (and beautifully). The lens I used was the AF-S NIKKOR 500mm f4G ED VR, slapped onto my Nikon D3X (full frame, 24.5 MP). I wanted as many pixels as I could get to resolve detail on the surface of the moon. As it was, capturing the supermoon with the 500mm on my D3X yielded a moon that was only 2.3% the area of the image. Small, huh? Crop city.
the lens weighs over 8 pounds

i always swap out the foot

It’s important to note that just because you get a hold of a lens, like let’s say, a 500mm lens for a day, don’t expect that you’re going to know how to use it the first time you try it out. There’s an adjustment going from your typical 50mm to a 500mm (or even to a 300mm). It’s a different beast altogether. Practice well before “go time”. Take a look at your images and figure out what you’re doing. Do your homework. How many people have purchased new gear right before going on a big trip? I’ve done that. Missing a great shot because you didn’t figure out the technical details when you should have is sad. Been there.
I currently use the Really Right Stuff (RRS) system of quick-release clamps, L-plates, and lens feet. So I invested in the RRS lens feet for the Nikkor 200mm-400mm telephoto zoom and the Nikkor 500mm pictured above for the couple times a year that I do use those lenses. This ensures that the lenses are mounted rock solid to my tripod and ballhead (Acratech) setup. Speaking of tripods…
gitzo gt3531 series 3 carbon 6x tripod

If you spend a substantial amount of money on a good camera and good glass (and I’m not even talking about these ginormous telephoto lenses, but any of the holy trinity: 14mm-24mm, 24mm-70mm, 70mm-200mm or other lenses that burned a hole in your wallet), you owe it to yourself to purchase a proper tripod. By proper, I mean one that is sturdy, and it doesn’t have to break the bank. If you want it to be light-weight, compact, and quick, that’s another story – but sturdy is important for a couple of key reasons: 1) if you have a top-heavy setup, it’s only a matter of time before your nice camera and nice lens meet the ground in a bad way and 2) a sturdy tripod reduces camera shake. The longer the focal length, the greater the sensitivity to camera shake. I swear that 500mm can detect earthquakes across the globe. Okay, not really, but it is super sensitive to anything, including pressing the shutter release to take a picture.
meet the remote (nikon mc-36)

This is like the cable release back in the day. It hooks up to my dSLR and when I press the shutter release button on the remote, my camera snaps away without my having to touch the camera and mess up the shot. And it has a handy timer and interval settings which are great for time-lapse or sleepy moments in the middle of the night while waiting for shooting stars overhead. Edit: You don’t HAVE to have one of these, you can also use a self-timer on 2-second delay.
When I go out specifically to shoot, I carry a backup camera (it’s usually the Nikon D700, but on this shoot I only had my iphone), extra batteries that are fully charged, extra memory cards that are wiped clean, other lenses, filters, blower, etc. So that covers the camera equipment I use for this kind of shoot.
Being outside means being prepared for the weather, and we get all sorts of interesting weather here in the Colorado Rockies. A hat is mandatory (sun hat and a warm hat). Gloves are good – especially fingerless gloves or mitts that have a flip top. My gloves are worn down so that there are holes where the pads of my thumbs and index fingers are. Works well for fine manipulation of equipment. Dress accordingly knowing that you’ll probably be standing around waiting. While 35°F can be balmy when you’re out walking around, it can chill you to the bone if you’re standing still in the wind for a couple of hours. Be smart and be prepared. Bring water.
and a compass

I usually raid my hiking equipment before a shoot because I use some of the same gear. The compass is necessary for locating where the heck the moon is going to rise (or set). I realize a smartphone works too – unless of course it is out of juice. And you will get screwy readings inside your car or near power lines (due to distortion of the magnetic field). A great little program to use for planning purposes is The Photographer’s Ephemeris (TPE) (desktop version is free). They have mobile app versions too. TPE provides ephemerides for the sun and moon based on your location and date, because the azimuth of moonrise (and sunrise) varies. I like the compass as a no fail backup. Here is another no fail as long as you know how to read it:
a topographic map
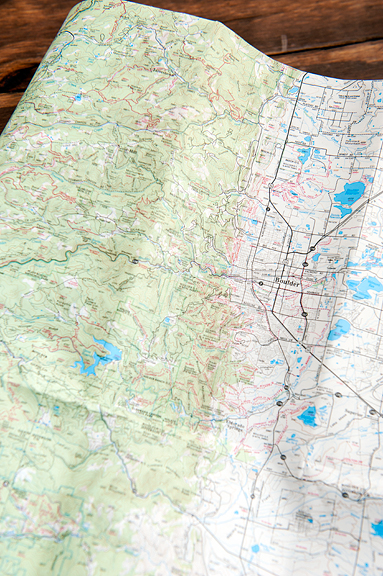
We are located in what I consider a terrific topographic setting where the Rocky Mountains meet the Great Plains. The Great Plains are bloody flat. FLAT. The abrupt rise of the Rockies to the west is a striking feature. Between the plains and the high peaks, there are deep canyons, long ridges, local peaks, subtle benches – all layered in a beautiful network. The task at hand was to determine the best location to shoot moonrise with a good view to the East. I figured I wanted to catch the moon as early (low) as possible, because it would be the most colorful and dramatic just on the horizon. The obvious choice would be to sit on the edge of the foothills and watch it come up over the plains, except I found that to be a little boring. It’s nice to catch the moon rising behind something interesting – like a mountain or a treed ridge.
I spent a couple of hours scouring topographic maps and the terrain mode on Google Maps to determine the best locations to scout ahead of time in addition to some places I’ve had decent results with in the past. Then Jeremy and I drove three hours up and down and around and back through mountain roads and canyons, hopping out to assess the view and take readings on the horizon and the azimuth of moonrise. Just because it looks good on the map, doesn’t mean it won’t be completely obscured by giant trees. Once I had determined the best location, we timed how long it took to drive home. Moonrise was at 7:57pm (just a few minutes from sunset – full moons always rise sometime around sunset), so I would be there by 7:15pm. Back at the house, I packed everything up and tossed a headlamp into my pack.
headlamps are awesome for work, for recreation, for emergencies – you should own one

There are a lot of headlamps in our house and cars, some as old as 20 years. I cannot sing the praises enough for hands-free illumination during blackouts, at night in the backcountry, when your car breaks down, to check dark corners in the house, to pull splinters out, etc. Of course, anytime you do night photography or astrophotography, it is really helpful to have a headlamp. Even better than a headlamp is a headlamp with a red light.
roxanne!

Anyone who has used a standard white lamp when doing night photography knows that you suffer from blindness as you transition from light to dark (i.e. when you shut off the lamp and try to readjust your vision). The red light is terrific for not giving you a terrible headache and for not creating a lot of light pollution, especially if there are other photogs around.
So there’s another factor that you and I have no control over – and that is the weather. I have a love-hate relationship with the weather. It’s mostly love though, because I’ve accepted that she’s going to do what she wants and anything I can get is a gift. An expansive cover of clouds was slowly moving across the mountains toward the plains all day long, building and accumulating. I probably looked up every five minutes to assess the conditions. It was worrisome, because there was a huge amount of moisture in the air as a snow storm was coming in the next day. It wasn’t promising. Clouds can kill a shoot or make it extra awesome, and it’s a fine line.
to the west, a little clearing and beautiful colors (iphone)

Jeremy asked if I even wanted to bother as we peered out toward the plains and saw nothing but cloud cover – low and widespread. But you know, you can’t NOT try. I’ve seen too many amazing things happen in mere seconds that are worth the effort. I think that’s the excitement right there for me. If after all of that work, I came away with nothing, I’d be okay with that. It’s okay. And if I manage to capture something, even witness it without capturing it – that’s the gift.
heavy clouds piling up to the east (iphone)

Because I chose a mountain foreground, I wasn’t sure where the moon would be rising exactly, as it was above the horizon. And, I wasn’t even sure if we would see the moon at all. I took a few snaps with my iphone just to record the pretty colored clouds when Jeremy asked if I saw something on the mountainside. I looked through the lens and there she was. The rising moon is always so much bigger than I anticipate.
tiny bright sliver

here’s the zoom so you can see it better

It took a few seconds for us to realize what we were seeing. How could it possibly be so clear? Shut up and shoot! 8:01pm. I had my light meter set to spot metering, on the moon. Even though it’s more dim when it is low on the horizon, the moon is the brightest object in the frame. I varied my f-stops from f11 to f22 because I wanted more detail on the moon’s surface. I also underexposed with a faster shutter speed by several ticks (one stop or maybe just over) because the moon kept blowing out (overexposure) on my histograms. Also, the moon moves pretty quickly. You can’t sit on it for too long before it begins to blur (unless you are tracking it, but my astronomer hasn’t built that for me yet). An exposure of 1/3 of a second was probably the limit before I began to see blurring.
it was pink

then it was orange

it looked like it was climbing up the hill

After the initial excitement, I stood with Jeremy and another local elderly woman and we admired the moonrise with oohs and ahhs and wows and “beautiful!”. Jeremy asked to look through the lens and I invited the woman to have a peek as well before resuming my photographs. The cloud deck was low, very low. I hoped there was enough interesting structure there to silhouette against the moon. Within five minutes of emerging, the moon was already drifting into the clouds. Click, click, click. Considering how bad the weather looked all day, I really don’t think I could have asked for better conditions, no matter how brief. By 8:09 pm, it was over. Then it was time for dinner!
you just need that one moment, but it helps to be ready

To summarize all of my blathering:
1) Equipment and Gear: Decide what you’re going to use and need. Know how to use it. Get your system dialed in ahead of time so you can concentrate on the capture and not fret over the technical stuff. Have backups at the ready. Check your settings: ISO? VR on or off? Autofocus on or off? Plenty of memory? Batteries full? Light metering on spot, center-weighted, or matrix?
2) When and Where: If you want to witness something awesome, this is more important than the gear. Choose your location wisely, or at least as informed as you can. If you know the moon is rising at 114.1° then you don’t want a giant mountain obscuring your sky or horizon to the east-southeast, right? (Maybe a low mountain.) It helps to scope things out ahead of time and arm yourself with the best information to make the best choices.
3) The Shot: Do a little pre-game visualization in your head of what kind of shot you’re aiming for. I don’t mean fantasizing about something you aren’t going to get – I mean a realistic composition based on 1) and 2).
4) Give yourself plenty of time to set up, walk around, assess (or grab a tripod space if it’s a popular place for photogs). Is that tree going to pose a problem as the moon rises at an angle across the sky (it’s not rising straight up)? Anticipate the path, know about your subject.
5) Cross your fingers that you don’t get completely clouded out.
6) Have fun!

May 9th, 2012 at 10:40 am
that woman with you two was very very lucky.
i have (on my bucket list) to use a lens like that let alone get a big girls camera.
WONDERFUL post Jen.
keep this up–please :-)
May 9th, 2012 at 10:44 am
Beautiful shots and excellent write up!
May 9th, 2012 at 10:49 am
wonderful..
you are such a talented lady..
wonderful..
May 9th, 2012 at 11:16 am
All great advice and your moon photos turned out beautifully! It’s been a few years since I’ve attempted moon photos. With my 400mm lens, I had to do some major cropping too. For some reason it never occurred to me to rent a lens – duh!
I’ve used a similar approach for shooting sunrise before, too. That resulted in some really cool photos!
May 9th, 2012 at 11:34 am
Thanks for teaching and sharing beautiful images, Jen.
May 9th, 2012 at 11:35 am
Well I think after all that I will be satisfied with looking at others pics of the moon ! LOL
Great shots !!
May 9th, 2012 at 11:44 am
Wow, those photos are amazing! Thank you for the explanation of how you completed the shoot. I think your suggestion of being realistic and making an effort are both important. What a great shot it you were able to get when the clouds cleared!
I’m curious if you use a specific camera app on your iphone for photos. Is there anything you recommend?
May 9th, 2012 at 12:35 pm
Oh man. I love this blog. My 2 favorite hobbies are cooking and photography and you ROCK at both! One day I hope to be like you :)
May 9th, 2012 at 12:40 pm
I’m taking a photography class right now (through Mike’s Camera in Boulder), and I will share this post with them. It’s great info, and you are a generous soul to put it all together and out there for us beginners to see. Thank you.
May 9th, 2012 at 2:00 pm
Breathtaking photos! You truly have a gift!
May 9th, 2012 at 5:17 pm
Amazing moon shots Jen. Thank you for sharing your photography knowledge. I’m sure others appreciate it as much as me. xx
May 9th, 2012 at 11:08 pm
I didn’t read the words. I’m sure you just did it by magic. Those are magical photos.
May 10th, 2012 at 4:46 am
Beautiful….just absolutely beautiful…
May 10th, 2012 at 5:57 am
Thanks a lot for all this explanation! I thought so, 500mm! Well, one day perhaps the dream will come true for me, too! We lack this great rental shop and lenses here in Brazil cost a fortune, triple your price and you get the idea…
Thanks again, everything was so helpfull!
May 10th, 2012 at 8:12 am
Fantastic! Is it possible to purchase an image? Thanks
May 10th, 2012 at 11:27 am
OMGosh…
that is sooooo beatuiful…thanks so much for sharing all this information…I live in Illinoisl…but racing in a 50kUltra trail race in Montana….I’m hoping to get some shots there…renting a cabin….yes..headlamps are your friends ;-) I look forward to all your great photo’s…they are truly breathtaking.
Kat ;-)~
May 11th, 2012 at 8:16 am
Great shots! You were so lucky to have had clear skies that night. I only had about 30 seconds of SuperMoon due to cloud cover, so I had to shoot my only pic as it peeked through the clouds.
May 13th, 2012 at 8:26 pm
Awesome!!! Thanks for sharing.
May 19th, 2012 at 10:35 pm
Thanks all! So glad it was helpful and hopefully you’ll get a shot at the moon the next time it’s full!
wanG – you’re very sweet, thank you xo
Kathy – nothing wrong with that either! Sometimes the photography can be a killjoy for folks. I say go with what works for you and if that means seeing it with your eyes and enjoying other photos, then great! :)
Caroline – I just use the straight photo tool on the iphone. I don’t use any apps for photos although I do bring it into Photoshop on my computer to make any adjustments if necessary. So I don’t actually have any recs – sorry!
Allie – xo
barbara – I’m always happy to answer your questions, my dear friend.
Ellen – yes, depending on the image. I’ll send you an email.
kat – thank you!
Theresa – well, we only had 9 minutes of clear skies on the horizon then got clouded out.
May 22nd, 2012 at 7:06 am
Hi,
After looking at the eclipse photos and re-reading this entry and having put countless copies of your recipes in my files I figured it was about time to let you know how much I appreciate the time you take to do it all. The images – whether lupine, mousse, or moon – are always tantalizing. Your commentary is always engaging and enticing. I’m glad you’re out there doing what you are doing and living where I am not so I can read and experience vicariously.
Thanks,
Carole
May 25th, 2012 at 11:37 am
Jen,
This is so totally awesome that I can’t NOT comment! I just attended the 2-day “Google Plus for Photographers” conference in San Francisco and decided to finally get more engaged with social media. I’ve been reading your blog exclusively (‘cuz it’s the BEST!) for the last year or so, and I’ve told a ton of people how much I love it. Sadly I haven’t ever commented, but I did meet you at the Denver Botanic Gardens last year and told you in person how awesome I think you are! (I’m the fellow Cornellian — redhead– that chatted with you the opening night).
Anyway — I noticed you didn’t post this on your Google+ page. If you want to post this to other circles of photographers on Google+ that I learned about this week, let me know. I’m sure you could get a ton of followers, if you want more!
Cheryl
May 25th, 2012 at 11:45 am
Carole – you’re such a dear xoxo
Cheryl – thank you, I do remember you! :) I did post it on the G+ page, just scroll down xo