baked oats green chile chicken enchiladas chow mein bakery-style butter cookies


copyright jennifer yu © 2004-2023 all rights reserved: no photos or content may be reproduced without prior written consent

add a little zing to your life

Sunday, August 12th, 2012

Technique: shooting lightning

You could say I have a slight obsession with lightning. Our house faces southwest and in the summer, the southwest monsoons move over us from that direction almost every afternoon like clockwork. I can see the thunderstorms in the distance as they approach, dropping lightning bolts on the Continental Divide and neighboring ridges. Familiar enough with the patterns, I’ve been able to capture some great strikes and more likely than not, miss plenty of other great strikes. When I share my photos, someone will invariably marvel at my presumed quick reflexes and my amazing ability to anticipate the lightning.


multiple cloud to ground strikes (10 seconds, f8, 29mm, ISO 100)


My reflexes are pretty quick, but they aren’t THAT quick. And my anticipation of lightning is as good as my observation that there is a lightning storm in progress. The trick is not to wait to take a snap when you see the lightning, because on average cloud-to-ground lightning discharges on the order of milliseconds. No one is that fast and luck only gets you so far. To achieve consistently decent results, I take the longest possible exposure and do so consecutively throughout a lightning storm.

If you plan to try shooting lightning, there are a few things I’d like to recommend:

1) You’re going to have to shoot on manual.

2) Use a tripod. You’ll need it for all of those long exposures.

3) Go with short focal lengths (wide angle). If you’re just starting out, give yourself a wide field of view to capture any random lightning strikes that may occur around you. Once you become familiar with the storms of a certain area (i.e. they always strike a certain ridge or an isolated microburst is hammering away in one area) then you can tighten the shot and use longer focal lengths.

4) Resolution helps. If you are choosing between your 18 mega-pixel camera and your 8 mega-pixel camera, go with the bigger sensor. The reason? You will most likely crop down to isolate the lightning if you are shooting a wide field. More pixels help to maintain a better image when you crop down.

5) Start with a fully juiced battery. Long exposures drain the battery faster than your typical snaps.

6) Make sure you have plenty of memory. Who knows how long this storm will last? Wouldn’t it suck if you ran out of memory on your flash card only to have the mother of all lightning bolts strike right after your card finished? Yes.

7) If possible, shoot from a sheltered area or safe distance. Thunderstorms are often accompanied by rain, so being able to shoot from the doorway of my deck helps to keep the rain off of my lens until the winds start driving the rain into the house. If you are far enough away from the storm to shoot it in the distance, great. However, keep in mind that being out under an approaching storm (even if it isn’t raining) puts you at an increased risk of getting zapped. If it IS raining and you are outside with an umbrella over your gear during an active thunderstorm, then you’re just asking for trouble (and by trouble, I mean death).

8) Don’t get killed. Lightning is no joking matter. Lightning can carry over a billion volts.

night lightning
Probably the easiest way to shoot lightning is during a nighttime lightning storm. I like to focus just shy of infinity because that’s usually where my local lightning hits, set my aperture to f8 or thereabouts, leave my ISO on 100 (or the lowest native ISO setting), and put the shutter speed on 6 seconds if the storm is active, and up to 20 seconds if the strikes are less frequent. I cannot actually see where I am focused because it’s pitch dark, but I know from daytime experience that this side of infinity works for me on a relatively wide angle (less than 45mm). Same thing goes for field of view. I usually have to futz with my camera and wait for a lightning strike to light up the area so I can frame my field of view. Again, as with most of my nighttime photography endeavors, I like having a red light headlamp so I can see my gear without blinding myself.

I live in a location with minimal light pollution, so dark is truly dark. If I were to take an exposure for 20 seconds at night, it would be mostly black. Now if lightning were to strike in my field of view anytime during that 20 seconds when my shutter was open, it would be captured in my image. If there were two lightning strikes a few seconds apart, but both within the 20 seconds when my shutter was open, I’d have two strikes captured in my image.


forked lightning (20 seconds, f8, 44mm, ISO 100)


Thunderstorms used to catch me off guard, but these days I watch for them. First, I check the weather report for that evening which is wrong a good 50% of the time. Then I check the radar to follow active storms moving our way. Of course, I can also tell when the storm is arriving from the flashes of light in the distance and the rumble of thunder nearing. It’s kind of exciting. As the storm moves over my location, things usually go downhill quickly. For one thing, the rain and winds make it almost impossible to continue shooting (I put the hood on the lens at night, which helps at the start of the rain, but is useless when driving rain is coming right at you). Secondly, when the storm is directly overhead, not only does the rain prevent me from shooting straight up, but I’d have to be outside, under a massive electric potential (that is dangerous).

cloud to cloud (16 seconds, f2.8, 20mm, ISO 100)


Night lightning in dark places is pretty straightforward because you can set your shutter speed to whatever you like. When conditions are lighter, like sunset or dusk, or if there is considerable light pollution coming from city lights, traffic, or even the moon, then I try to take care that my shutter speed doesn’t blow out the other light sources. This means there will be a limit on the shutter speed to achieve proper exposure of the entire image. It makes for a nice composition if you can get those elements in place in addition to the lightning.

storm at sunset (15 seconds, f7.1, 26mm, ISO 100)

evening strike (10 seconds, f22, 20mm, ISO 100)


**Jump for more butter**

not your ordinary sunday

Monday, May 21st, 2012

Butter headquarters is coming to you this morning from The Land of Enchantment – New Mexico! Jeremy has a meeting here and since we are fans of the multi-tasking, I suggested we stop in Albuquerque on the drive down, to… you know, SHOOT THE ANNULAR SOLAR ECLIPSE?!

Albuquerque was along that narrow swath to get a perfect ring when the moon passed between our sun and our beloved planet. Jeremy, native son of New Mexico, suggested getting a high vantage from someplace like Sandia Crest, 5000 feet above Albuquerque. Several hundreds (thousand or more?) had the same idea… The forest service had the tremendous task of managing parking and emergency services while throngs of excited people flocked to the long north-south ridge crest. My National Parks Annual Pass got us in the door (they turned cars away that didn’t have a recreation pass – those folks parked further down the road).


to my south: my setup and fellow eclipse watchers

to my north – more eclipse watchers


For those wanting to know, here is what I shot with: my main system was the Nikon D3X with the Nikkor 500mm f4 lens (lens courtesy of Pro Photo Rental, they are the best!) and a sheet of Baader Astrosolar safety film courtesy of Doug Duncan, the Director of the Fiske Planetarium at the University of Colorado, Boulder. My second system was the Nikon D700 and a Nikkor 24-70mm f2.8. My third system was the iphone.

the sun, high in the sky


It took 30 minutes to scout out a proper location without obstructions and without getting in anyone’s way (remember, you want a clear path all the way to sunset). We finally settled among a group of the nicest people from New Mexico, Texas, and even two charming gentleman from as far away as the UK! There was a buzz of excitement in the air, even with over an hour to wait before anything actually happened. Jeremy and I had our handy solar eclipse glasses we purchased from our local hardware store (McGuckin – they’re awesome!). We purchased a dozen extras and proceeded to hand them out to anyone who needed a pair. [One New Mexico resident, Joseph Woods, was so appreciative he gave me his card and said I could select one of his artworks as a thank you – so sweet!] Before long, people were sharing food and filters and everyone was so damn nice! We should have eclipses more often.

the view over the rio grande rift valley

getting dimmer during the eclipse, but it was still incredibly bright out


Around 6:31pm (according to my camera time stamp), the moon began to take a small nibble out of the bottom right corner of the sun. We had about an hour to totality (when the moon is directly centered on the sun – in this case, the annular eclipse results in a ring). Mine was likely the most powerful magnification in my vicinity, and since eclipses are thankfully slow, I offered to let my neighbors look through the camera at the sun, sunspots, the shadow of the moon throughout the phases. SCIENCE!!! I photographed the disc of the sun with the big guns, but Jeremy reminded me of other fun things like eclipse shadows and pinhole projections.

pinhole projection on the only paper i had

cool eclipse shadows from the leaves projected on a rock (photo by jeremy)

the sun at totality – it’s still super bright

pinhole projection at totality


**Jump for more butter**

shoot the moon

Wednesday, May 9th, 2012

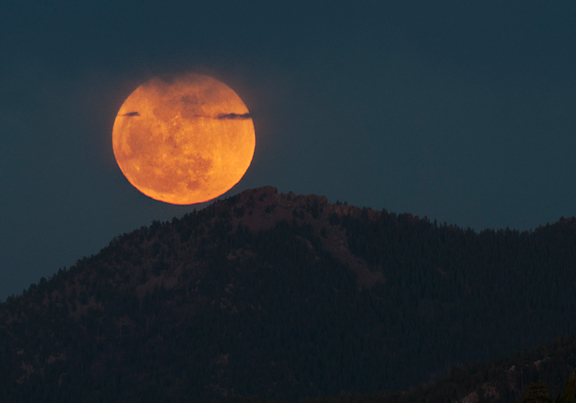
People often ask how I shoot things like lightning, meteor showers, the moon. To be honest, it took a lot of attempts and screw ups and reading for me to manage any level of competency and I’m *still* screwing up and I’m *still* learning. But after the recent supermoon event, I thought it might be helpful to document a little of my process. The moon, unlike lightning, is something you can plan for well in advance (thank you, SCIENCE!). And unlike meteor showers, you can know exactly where it is going to be. It’s also pretty big, which makes locating it less of a mystery.


ye olde supermoon rising


When I first took interest in photographing the moon, I would see it outside, grab my camera and take some photos. I usually got bupkis, or something close to it. My moon was a teeny white dot on a sea of black night sky, usually void of any details. The nice thing about the moon is that it makes a regular appearance in the sky and the great advantage of digital is that I could burn tons of crappy images and learn from my countless mistakes relatively quickly.

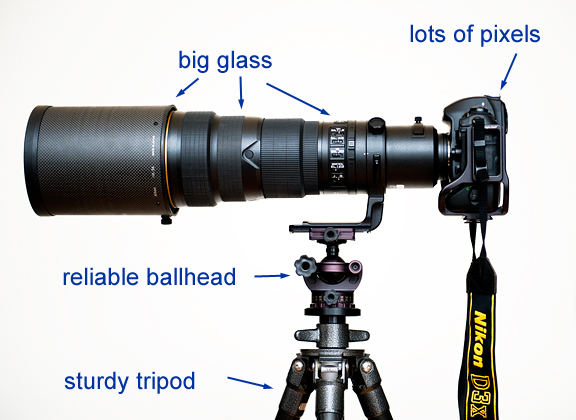
here is the setup i used on the supermoon


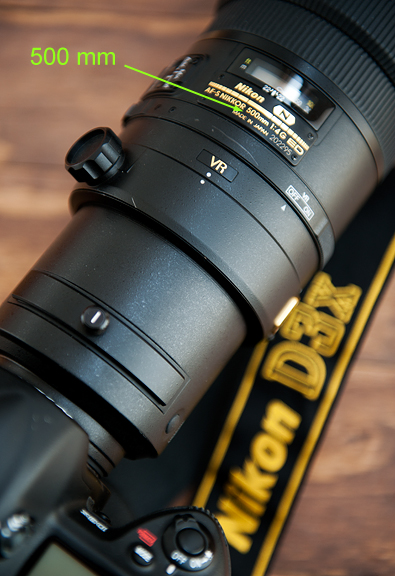
Right now, I’m gunning for a big moon, because I have never nailed that to my satisfaction. I don’t do enough serious telephoto photography to justify dropping $8,000+ on a single lens and I don’t know that I ever will. However, I do have the option to rent these very expensive, very wonderful, very powerful telephoto lenses from my friends at Pro Photo Rental in Boulder (they ship US and Canada). You can, of course, do remarkable work with landscape captures of the moon. My mentor and friend, Michael Frye, achieves this routinely (and beautifully). The lens I used was the AF-S NIKKOR 500mm f4G ED VR, slapped onto my Nikon D3X (full frame, 24.5 MP). I wanted as many pixels as I could get to resolve detail on the surface of the moon. As it was, capturing the supermoon with the 500mm on my D3X yielded a moon that was only 2.3% the area of the image. Small, huh? Crop city.

the lens weighs over 8 pounds

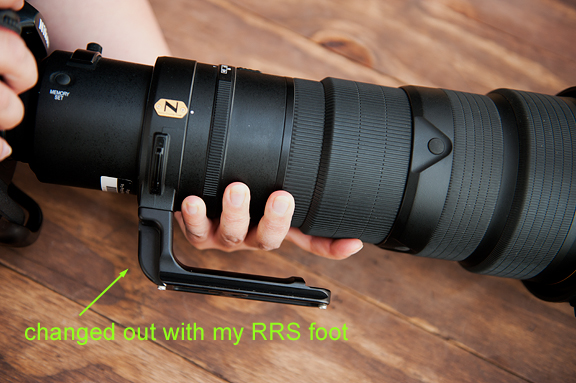
i always swap out the foot


It’s important to note that just because you get a hold of a lens, like let’s say, a 500mm lens for a day, don’t expect that you’re going to know how to use it the first time you try it out. There’s an adjustment going from your typical 50mm to a 500mm (or even to a 300mm). It’s a different beast altogether. Practice well before “go time”. Take a look at your images and figure out what you’re doing. Do your homework. How many people have purchased new gear right before going on a big trip? I’ve done that. Missing a great shot because you didn’t figure out the technical details when you should have is sad. Been there.

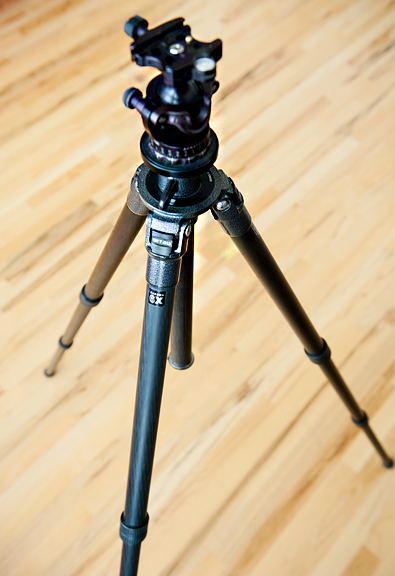
I currently use the Really Right Stuff (RRS) system of quick-release clamps, L-plates, and lens feet. So I invested in the RRS lens feet for the Nikkor 200mm-400mm telephoto zoom and the Nikkor 500mm pictured above for the couple times a year that I do use those lenses. This ensures that the lenses are mounted rock solid to my tripod and ballhead (Acratech) setup. Speaking of tripods…


gitzo gt3531 series 3 carbon 6x tripod


**Jump for more butter**