


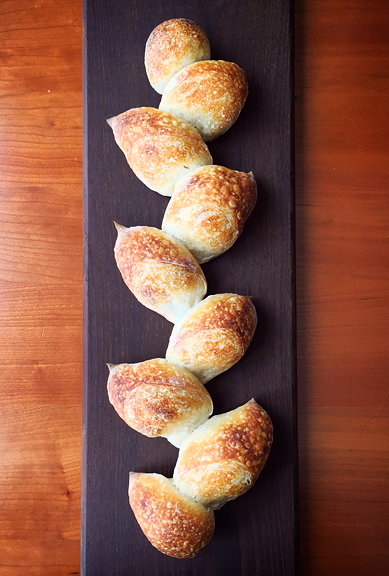
alas, the baguette

After spending the last two months trying different recipes and employing a variety of techniques, I think I’ve finally found the right sourdough baguette recipe! By “right”, I mean it has all of the qualities I seek in a sourdough baguette. I have not traveled the world in search of the finest baguettes, but I do know what I like. My desire to document how to make a sourdough baguette is mostly for my own convenience as my notes are currently scattered between several messy and cryptic pages in my recipe notebook.
So what makes a good baguette in my book? I love the slightly floral and mildly sour notes that come from using sourdough starter as opposed to added yeast. The interior should have an airy and delicate structure without being mostly holes. I want to sink my teeth into bread, not air. It should have a well-browned crust with shine and blisters. That crust ought to crackle and shatter when cut. And my biggest motivation for making my own baguette: the base should not be caked in flour (ahem, Boulder Whole Foods). If someone made the perfect baguette, I would gladly buy it. Now I don’t need to.
Making the baguettes spans 3 days for me. The first day is mere minutes in the evening when you make the levain. The second day is the bulk of the time commitment. The autolyse step (letting the flour(s) absorb the water) can be as short as 30 minutes up to 4 hours. I tend to mix the dough early in the morning and give myself a 4 hour window to work, get a workout, run errands, etc. Then I spend the next 2.5 hours near the dough, but it only requires a minute of my time every 30 minutes to turn the dough (four sets of folds at 90 degree rotations). After the last turn, the dough can rest 30 minutes to an hour. I always choose the longer period of time which may or may not be a good thing. Once shaped, I put my dough in the refrigerator for a 12-24 hour cold proof. This means you need to make space for something like baguettes which require a lot of area, but not much height. I don’t proof at room temperature because I find shaping and handling cold dough to be far easier. The next day, I bake the bread which takes about 35-40 minutes per baguette. Planning when to fit this into your schedule is probably the hardest part.
The unicorn was the baguette. The rainbow unicorn was the épi de blé or sheaf of wheat.
my épi de blé
testing whole wheat percentages
My baguette expedition rambled through a few recipes before I circled back to the dough used for my favorite sourdough bread, which is based on the recipe from Tartine in San Francisco. All the steps are the same up to the shaping, but I decided to swap some whole wheat flour for a little of the bread flour, gram for gram. [Using a kitchen scale rather than cups is going to see you to greater consistency and success when baking breads.] I made and we taste tested 0%, 2.5%, 5%, 10%, 15%, 20%, 25%, and 30% whole wheat flour baguettes. They all tasted GREAT. If entertaining, I would make a 0% (all bread flour) or 10% (10% whole wheat flour and 90% bread flour) baguette. The 0% is classic, but the 10% has a subtle nuttiness that I really love without feeling any heavier than the 0% baguette. The baguette does start to taste a little less floral and less sweet at 25% and 30% whole wheat flour.
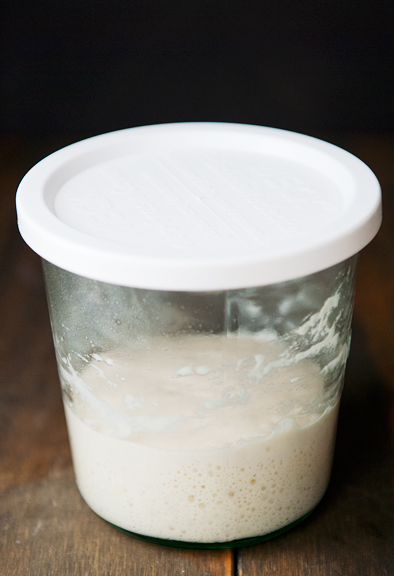
This sourdough baguette recipe doesn’t use any additional yeast, it relies on the sourdough starter for leavening. If my starter is in the refrigerator, I’ll bring it to room temperature and feed it daily for a couple of days before making the levain on the evening of day 1 (sometimes I call it day 0).
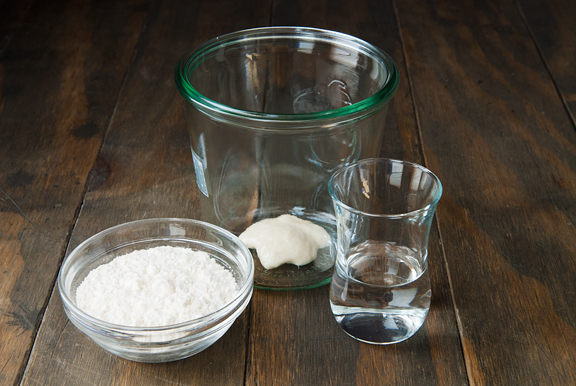
the starter should be fed, happy, and bubbling
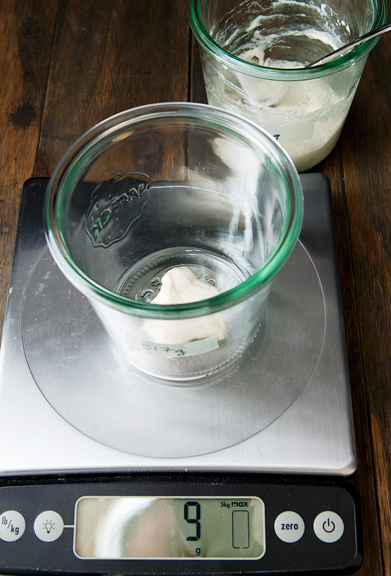
weigh out the starter
the levain: starter, bread flour, water
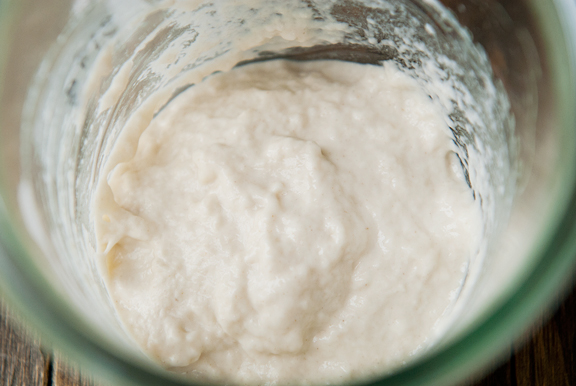
stir together
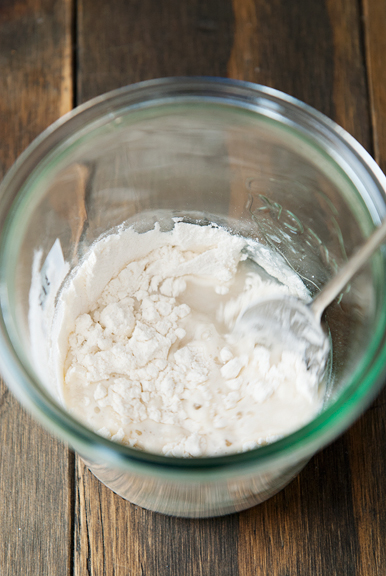
leave no dry pockets of flour
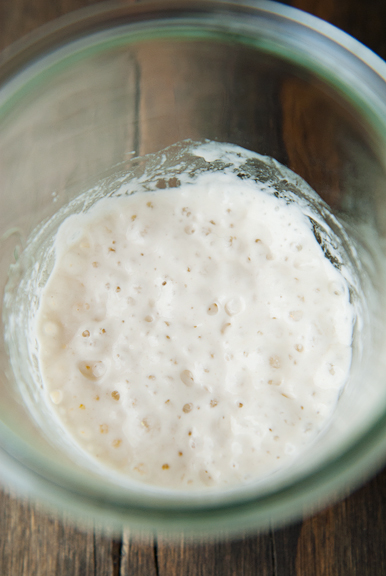
the levain is bubbly and ready after 8-12 hours
This recipe is for the 10% whole wheat flour baguette, but it’s straightforward to increase or decrease the amount of whole wheat flour to your liking. I did not test above 30%, so be aware that adding a lot more whole wheat flour might require more water (I don’t know how much – you might want to do some of your own research if that interests you). The amount of dough in this recipe makes a 1-pound loaf of sourdough bread which translates into two 16-inch baguettes or three 11-inch baguettes. My baguettes average about 2.5 inches in width and the length of your baguette will depend on the equipment you have: pizza stone, Dutch oven, roasting pan lid, oven, pizza peel, baking sheet, etc.
On day 2, the levain should be lively and bubbly. Stir it into the water until it is mostly dissolved, then add the flour(s). Mix the flour and water together until there are no more pockets of dry flour. It’s okay if it’s lumpy. Cover the dough and let it autolyse for 30 minutes to 4 hours. I usually place the bowl on top of my refrigerator where it has been the warmest in our winter and early spring months.
levain, whole wheat flour, bread flour, salt, water, and more water

stir the levain into the water

add the flours

mix until it forms a shaggy mess of dough

cover and let the shaggy mess of dough autolyse

When the autolyse is done, stir the salt into the remaining ounce of water. Be patient, it will eventually mostly dissolve. This helps with a more even distribution of the salt since we don’t really knead the dough. Pour the salt water over the dough and squeeze and pinch it until the liquid is incorporated and absorbed. The dough will be sticky and wet. Pull the edge of the dough furthest from you up and toward the edge of the dough closest to you. Tuck the pulled edge under the opposite edge. That is one fold. Rotate the bowl 90 degrees clockwise or counterclockwise (it doesn’t matter which direction, as long as you consistently rotate in the same direction) and perform another fold. Rotate another 90 degrees. Continue until you have done four folds. Four folds equals one turn. When the turn is done, cover the dough and rest for 30 minutes. Turn again, and cover and rest for 30 minutes. Repeat for a total of six turns. After the sixth turn, cover and let the dough rest for 30 minutes to an hour. The dough will become progressively smoother and more elastic with time and turns.
dissolve the salt in water

add the salt water to the dough

pinch and squeeze the liquid into the dough

fold the dough: pull one end of the dough up

…and across, tucking it under the opposite end of the dough

ready for shaping

How many baguettes you make will depend on the equipment you have. You can bake your baguette in a Dutch oven, but the diameter or longest axis of your Dutch oven dictates the length of the baguette. My wide Dutch oven is 12 inches in diameter, so my longest baguettes would be 11 inches which is about three baguettes from a batch of this dough (about a pound of dough). I have had good success with baguettes from my Dutch oven, but I’ve enjoyed greater success and flexibility using a pizza stone, a roasting pan lid, and a spray bottle. My rectangular pizza stone is 20 inches long and 13.5 inches wide. My roasting pan lid is 16 inches long and I can get two 16-inch baguettes from a batch of this dough. If you don’t have a roasting pan lid, you can easily invert one of those disposable aluminum foil roasting pans. I haven’t tried it, but I’ve read that it works just fine. The goal is to enclose the bread for the first 15 minutes of baking so that the water from the dough gives the outside a nice steam bath and develops that beautiful crust. Then when you remove the lid for the last 15 minutes of baking, that lovely crust will brown and become perfection.
my dutch oven

the pizza stone and roasting pan lid combo

Once you have determined the size of your baguette, turn the dough out onto a lightly floured work surface and divide the dough into two or three pieces (or four if you are working with smaller dimensions). Before shaping your dough, I encourage you to view this video several times to get an idea of how to do it. I came to this baguette shaping tutorial from Clotilde’s baguette recipe. It’s hard to describe in words or even still photos, but basically pat the dough into a rectangle, dog-ear the corners closest to you toward the center, and begin rolling from the edge closest to you until you have rolled it all up. It works best if you don’t overflour the workspace or the dough because you want it to stick to itself. Of course, if it’s sticking to you more than to itself, use a little flour. Let the logs rest while you prepare the couche.
My baker’s couche is a flax linen proofing cloth that is flexible enough to form into various shapes, but sturdy enough to hold those shapes. I have also used a kitchen towel when I didn’t have my couche available and that worked well. You rub flour into the weave of either one so that your dough doesn’t stick to the fabric. The weave will hold the flour as well as allow air to dry out the surface of the dough during proofing.
cut the dough

flatten a piece of dough into a rectangle (roughly)

fold in the corners closest to you

start rolling the dough up like a rug

you can tuck the sides in as you go

roll it into a neat little log

rest the logs

prepare your proofing cloth

The final shaping of your baguette involves flattening the dough log, folding the long edges in toward the center line, then folding the log in half lengthwise along that center line. With your hands starting at the middle of the dough log, gently roll it back and forth, moving your hands away from the center toward the ends to elongate the dough. Try to keep it even in thickness and stop when it reaches the desired length (in this case, 15.5 inches). You can taper the ends as you like. Some folks really taper their baguettes to a point, but I like mine to be a little rounded and fat. Again, I refer you to the shaping video to see it in action.
pat the log out

fold and seal the bottom edge up toward the center line of the dough

turn the dough 180 degrees and fold and seal the other edge up toward the center line

fold the dough in half lengthwise along the center line, pressing down with the other hand

roll it out

almost 16 inches

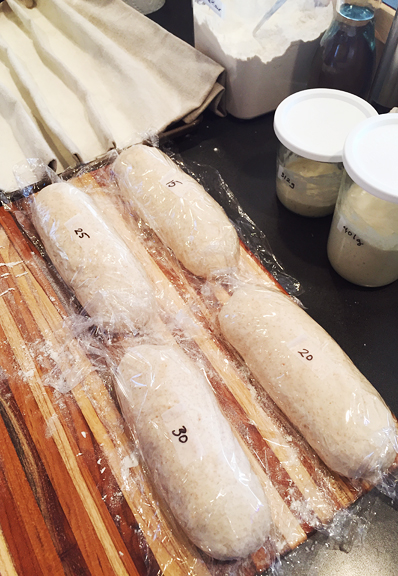
When the dough is shaped, set it in a trough on your proofing cloth. Because I put my dough in the refrigerator for a cold proof, I place my proofing cloth on a baking sheet (half sheet) for ease of transport. If you have more than one baguette, form a trough next to the first baguette and so on. The reason I began cold proofing my breads is because I like the more complex flavor a cold proof imparts on the bread. Then I realized it also gave me a break from the bread-making frenzy, allowing me to bake the next day whenever it was convenient. But after experimenting with baguettes, I discovered that cold dough is much easier to handle and more resilient to (my) abuse. Also, the shaping holds better when I bake cold dough. Before loading the baguettes into the refrigerator, you need to wrap the entire ensemble in a plastic bag. The first time I did this, I used a giant Macy’s bag. It worked well, but I couldn’t see anything. I purchased a box of XL Ziploc bags and now slide the baking sheet into one of those oversized bags, folding the excess neatly around the baking sheet.
set up on the couche

sealed in the ziploc for nighty night

Now for baking day! I try to cold proof the dough for at least 12 hours and sometimes I go as much as 24 hours with no issues. I preheat my oven to 500°F with the Dutch oven or the pizza stone/roasting pan lid combo in the oven. It helps to think ahead and get your oven racks and equipment arranged before everything is a blazing 500°F. Some people insist that your oven should continue heating at 500°F for an hour once it reaches temperature, but I think 10 minutes is sufficient for my oven. I try to avoid wasting energy and as the weather warms, I don’t want more heat in my kitchen than necessary. If you are baking in a Dutch oven, have a piece of parchment paper ready. It should be at least as long as your baguette. If you are using the pizza stone method, have a piece of parchment paper ready (as long as your baguette) and set it on a pizza peel or the back of a baking sheet – these are the easiest methods for safely transferring your dough to the VERY HOT pizza stone.
Once the oven is ready, I take my dough out of the refrigerator and set one baguette on the parchment paper. I return the rest of the baguette dough to the refrigerator. Score the baguette with a knife or a bread lame (basically a razor blade with a handle). Three vertical slashes will do. I spritz the baguette with a few squirts of water from my spray bottle. For the Dutch oven method, quickly remove the Dutch oven from the oven and immediately close the door – you lose a lot of heat whenever that door opens. Remove the lid, grab the parchment paper by the edges and quickly, but carefully, lower the dough into the center of the Dutch oven. Cover with the lid and place it in the oven. For the pizza stone method, open the oven and remove the roasting pan lid. Using the pizza peel or the back of a baking sheet, slide the dough and parchment paper onto the center of the pizza stone. Place the roasting pan lid over the dough. Close the oven (be quick, you are losing heat!).
Both versions bake for 10 minutes covered, then I reduce the oven to 450°F and continue to bake covered for 5 minutes. Then I remove the lid and give the bread a few more sprays of water. The Dutch oven tends to burn the bottom of the breads a little more than I like, so when I remove the lid, I bring the whole Dutch oven out of the oven (close the oven door), remove the lid, take the bread and parchment out of the pot, place a small heatproof rack in the pot and set the bread atop the rack. This goes back into the oven without the lid or the parchment. After 7 minutes, I rotate the bread 180 degrees to even the browning (my oven sucks), give it a few more sprays of water, and let it bake another 7-8 minutes depending on the color. Let the breads cool on a rack completely before cutting into them. Alternatively, tearing into a fresh, warm baguette is nothing short of amazing.
score the dough

i use a pizza peel to transfer the dough to the oven

having removed the lid, spray some water on the bread and let it brown

Of course, it would be more efficient if I could bake multiple baguettes under my roasting pan lid. I tried that and had the curious result of my baguettes being underbaked on the sides that were adjacent to one another – perhaps because they insulated those sides from the heat of the roasting pan lid. That’s why I bake them one at a time now.
the incident of the two baguettes with one side underbaked

my kind of baguette

If you want to make an épi (épi de blé which translates to sheaf of wheat), take a pair of kitchen shears to your baguette dough right before it goes into the oven and snip at a 45-degree angle every couple of inches, positioning each new lobe on alternating sides of the main axis. You don’t want to cut all the way through the dough or your épi will break at that point, but your lobes will come out prettier if you get close to cutting through the dough. It’s a fine balance, so give yourself a chance to practice. Épis are really fun for sharing with people because you can tear off a lobe that serves as 2-3 slices of baguette or a small roll. They are also gorgeous.
cut at an angle

arrange the lobes on alternating sides

or make a wreath and keep the lobes on the outside

i could do this all day

I never thought I could bake a decent baguette in my own kitchen, but I have managed to achieve everything I love about a baguette in the last 2 months! I wanted a sourdough baguette without added yeast that was brown and crusty outside, tender, fluffy, airy, but not overly dominated by holes on the inside. The flavor is mildly sweet, slightly floral, tangy, and earthy. And the baguette isn’t covered with flour (something I detest). Added bonus? These reheat perfectly. When I was in the throes of testing, we had as many as 6 baguettes. I sealed them in ziploc bags and chucked them into the refrigerator for over a week and they are great. To reheat, place the bread in a 350°F oven for a few minutes until warmed through and it will be as good as fresh baked. I haven’t tried freezing the bread yet, but I have read that freezing works well, too.
the interior

jeremy’s favorite: baguette with brie

Sourdough Baguettes
[print recipe]
based on this recipe and this technique, and some futzing around
This recipe makes two 16-inch baguettes or three 11-inch baguettes
levain
1/2 tbsp (8g) active sourdough starter
38g (1/4 cup) bread flour
38g (1/6 cup) water
dough
265g (9 oz.) water, room temperature, divided into 235g and 30g OR 8 oz. and 1 oz.
315g (scant 2 1/2 cups) bread flour*
35g (1/4 cup + 1 1/4 tsps) whole wheat flour*
1 1/2 tsps salt
*If you want all bread flour, then use 2 3/4 cups bread flour and omit the wheat flour. If you want more wheat flour, decrease the amount of bread flour by the amount of wheat flour you add.
Prepare your sourdough starter: If your starter has been in the refrigerator, let it warm up on the counter for an hour or two. Feed your starter daily for 2-3 days. It should be active and full of bubbles when you are ready to make your levain.
Make the levain: Mix the starter, flour, and water together making sure not to leave any dry pockets of flour. Cover and let sit on the counter overnight (~12 hours).
Prepare the dough: The levain is ready when it is bubbly and a little pea-sized dollop floats in water. Mix the levain and 1 cup (8 oz. or 235 ml) of water together in a large bowl until the levain is mostly dissolved. Stir in both flours to form a shaggy dough. Cover the bowl (I use plastic wrap because it is so arid here) and let the flour hydrate for 30 minutes to 4 hours (I do 4 hours). Mix the salt into the remaining 1 ounce (30 ml) of water and stir until all or most of the salt has dissolved. Pour the salt water over the rested dough and mix it in by hand, pinching and squeezing the dough until the liquid is completely incorporated and the dough is sticky.
Turn the dough: Facing your dough, grab the edge of the dough farthest from you, pull it up and toward you and tuck it down over the edge of the dough closest to you. Rotate your bowl 90 degrees (clockwise or counterclockwise is fine, just be consistent throughout) and repeat. Continue to do this until you return to your starting point (or have folded the dough 4 times). That is one turn. Let the dough rest covered for 30 minutes. Repeat for a total of 6 turns. After the the 6th turn, allow the dough to rest for 30-60 minutes (I rest for 60 minutes). The dough should be larger, but it won’t be doubled in size. As you turn and rest the dough, it should also become more cohesive and elastic and smooth.
Shape the dough: Turn the dough out onto a floured work surface. Using a pastry scraper, cut the dough in half (for 16-inch baguettes) or in thirds (about 11-inch baguettes) depending on the length of your pizza stone/pan cover or diameter of your Dutch oven. Sprinkle flour over the dough if it is sticky. Work the dough pieces one at a time. Flatten the dough out into a rectangle so that a long edge is closest to you. Grab the two corners nearest you and dog-ear them an inch or two toward the center of the rectangle. Begin rolling the edge closest to you toward the center. When you have rolled to the center, use your fingers to grab the outer sides and tuck them toward the center by an inch or two. Continue rolling the dough into a little log. Tidy the edges by tucking them under the log. Repeat for the remaining dough pieces. Let them rest for 20-30 minutes under plastic wrap.
While the dough rests, rub a generous amount of flour into a couche or a clean kitchen towel that is longer than your intended baguettes. Make sure the flour gets into the weave. I fold my couche so that it fits on a half sheet (17-inches long).
When the dough logs are rested, begin shaping each one. Take a piece of dough and flatten it on your lightly floured work surface, pressing out any large air bubbles. The long edge should be closest to you. Fold the bottom edge up to the longitudinal center line of the dough and press or pinch it down to seal it in place. I do this working from left to right. Now turn the dough 180° so that you can fold the other edge up to the longitudinal center line and seal it in place (the dough sticks to itself more easily if it isn’t too heavily floured). Now fold the dough in half with the center line acting as the crease. As you fold the top half down onto the bottom half with one hand (in my case, the right hand) use the other hand to press/seal the halves together and deflate any large air bubbles. Once the dough has been completely folded and sealed, gently roll the dough back and forth, working from the center to the edges to form a long log. The final length should be your target length for your baguette. Set your baguette dough on your couche or floured kitchen towel and form two ridges on either side of the dough with the floured fabric. Repeat for the remaining dough pieces, setting your finished baguette doughs next to ridge of the most recent baguette dough, and forming another ridge on the other side of the most recent dough.
Proof the dough: Place the baking sheet in a large plastic bag (I use an XL ziploc bag) and seal or tie off the bag. Set the ensemble in the refrigerator for a cold proof overnight or up to 24 hours. You could also do a room temperature rise for 3-4 hours, but I haven’t had good success with final shapes doing it that way.
Bake: If using a Dutch oven, place the Dutch oven with lid in your oven on the middle rack and preheat to 500°F. Get a sheet of parchment paper out that is as long as the baguette. When the oven has been at target temperature for 10 minutes or more, remove the dough from the refrigerator. Set the first baguette on the parchment (I do one at a time for the most even and consistent bake) and return the rest to the refrigerator. Score the baguette with a lame or a knife with three nearly vertical slashes down the center along the length of the dough. Spray the dough with water using a spray bottle (3 or 4 sprays should be fine). Using oven mitts, remove the Dutch oven from the oven (close the door). Quickly remove the lid, lower the parchment paper with the baguette dough into the center of the Dutch oven. Close the lid on the Dutch oven. Return to the oven. Bake 10 minutes. Reduce oven to 450°F. Bake 5 minutes. Remove the lid of the Dutch oven (at this point, I remove the parchment and place a heatproof steam rack under the bread in the Dutch oven to prevent scorching) and continue to bake for 15 minutes or until the crust is golden. Remove from oven and cool on a cooling rack. Repeat for remaining baguettes.
If using a roasting pan and pizza stone, set your stone on the middle or next lower rack of the oven (middle rack doesn’t leave enough room for me to lift the roasting pan lid), place the roasting pan lid on top, and preheat the oven to 500°F. Place a sheet of parchment paper that is at least as long as your baguette dough on a pizza peel or the back of a baking sheet. When the oven has been at target temperature for 10 minutes or more, remove the dough from the refrigerator. Set the first baguette on the parchment (I do one at a time for the most even and consistent bake) and return the rest to the refrigerator. Score the baguette with a lame or a knife with three nearly vertical slashes down the center along the length of the dough. Spray the dough with water using a spray bottle (3 or 4 sprays should be fine). Using oven mitts, remove the lid from the pizza stone, slide the parchment paper with the dough onto the stone, cover the dough with the lid. Bake 10 minutes. Reduce oven to 450°F. Bake 5 minutes. Remove the roasting pan lid from the oven, spray the bread with 3-4 sprays of water and continue to bake for 7 minutes. Rotate the bread 180° (for even browning) and spray 3-4 more times. Bake until the crust is golden. Remove from oven and cool on a cooling rack. Repeat for remaining baguettes.
Makes 2-3 baguettes.

more goodness from the use real butter archives

|
sourdough bread |

|
sourdough waffles |

|
gougeres |

|
grissini |

April 24th, 2018 at 12:36 am
Gorgeous! Absolutely gorgeous baguette. I made two loaves of bread today but they are not as stunning and professional like yours, but they are home-made. I love the feel of kneading dough with my hands. One day I hope to make such beautiful looking baguettes like yours.
April 24th, 2018 at 5:03 am
Beautiful loaves! They will freeze extremely well. I wrap in plastic, then foil…reheat as you describe and they are indeed just like fresh baked. It’s like money in the bank to have a few homemade loaves of bread in the freezer!!
I waffle between the crusty loaves and the soft fluffy milk bread…both amazing!
Thank you for the excellent recipe.
April 24th, 2018 at 8:06 am
Absolutely beautiful! I love all the loaf shapes…simple and entertaining. I can just imagine a nice butter, chunk of cheese, and a bottle of wine. Delightful. Thank you for sharing. Your attention to detail constantly amazes me.
xoxo, jill
April 24th, 2018 at 8:11 am
Thank you for taking us along on such a grand journey! While I’ll never attempt such an undertaking, it was great good fun reading about the evolution of your gorgeous creations, Jen. BTW ~ If you’re in the mood to try a local offering, the baguettes at Le French Cafe are the best I’ve found in Boulder. It’s just N of the Great Harvest in The Village.
April 24th, 2018 at 11:09 am
Will travel great distances for the perfect baguette! *books tickets to Colorado* Dogs fly free right? I’m exhausted and impressed thinking about all the work you put into those beautiful bundles of dough. The epis in particular look so cute and shareable! Ahh bread <3
April 25th, 2018 at 12:36 pm
So gorgeous. I hope my daughter finds a job nearby when she finishes grad school. She would love working on this with me, and I would love to share the bread with her so we don’t waste it or eat it all ourselves.
April 25th, 2018 at 1:28 pm
Is that a Laguiole cheese knife? May I ask where you bought it? I’ve been wanting to buy some Laguiole silverware and am not sure what a good source for it is.
April 26th, 2018 at 8:41 pm
Pey-Lih – It’s easy enough to do if you already know how to make bread! :)
Carla – Great to know, thanks!
jill – Awww, thank you, friend xo
MK – Oh, but MK, I think you could do this easily enough! And I DID go to Le French Cafe and try their baguette (on your recommendation, thank you). Theirs is the best baguette in Boulder, but… I think my homemade one is better ;) xo
Steve – I have been wanting to learn to make sourdough bread for over a decade, and when I finally got down to it, I love it and wish I had tried sooner. I encourage you to give it a try! I think you’d love it!!
Kristin – So sweet that you always share these experiences with your children <3
Sarah - Yes, it is! It was a gift from my friend, so I don't know where she got it, but I think you can probably find them online. This was part of a 3-piece set (blue handle soft cheese, yellow handle semi-soft cheese, and red handle mini cleaver for hard cheese). They're super cute.
May 1st, 2018 at 3:22 pm
hello yen,
i have a favor to ask: if there is anything, a.n.y.t.h.i.n.g at all that you cannot do to perfection i beg of you to tell me right now! else i shall feel like charlie brown looking at a star studded sky. i have long since accepted that you are an awe-inspiring cook and baker (i‘m not even mentioning the photography here, for fear of embarrassing myself even further with my bordering-on-teenage-fandome-like admiration), but what floors me every single time is your ability to explain complex (sometimes downright intimidating) procedures so clearly and succinctly.
you, dear lady, rock. massively!
May 1st, 2018 at 3:38 pm
yen ?? jen. sorry!
May 5th, 2018 at 12:41 pm
monica – You are so very kind. There are many things I am not good at, trust me :) I just don’t talk about those things here – ha ha ha! xxoo
May 6th, 2018 at 4:22 am
alas, i cannot possibly believe that! ??♀️ have a great outdoors-y sunday! xox
June 21st, 2018 at 2:48 am
1st- failed
2nd-manage barely… but got 2 French bread still eatable
3rd- dough looking great and confident.. but after mixing all the flour and salt water in went out came home to a well proofed dough WHICH DEFLATED AND TURN LIQUIDY:( tried to revive it by mixing more.. just like stirring my “coffee”… added more flour mix and rest 25minutes twice.. now sitting in fridge… hoping I can still make he loaves tomorrow…?
June 21st, 2018 at 7:07 am
Mae – Hmmm, based on your comment on the 3rd attempt, I’m guessing that part of the problem is mixing the flour and salt water in together. The directions in the recipe say to mix the flour and 1 cup of the water for the autolyse step (when you hydrate the flour) and to let that sit for 1-4 hours. The salt water isn’t mixed until after that step and it’s just 1 oz. of water with 1.5 teaspoons of salt. I think the reasoning for not adding salt too early is that it can kill the (wild) yeast in the levain, which might explain why it deflated and turned liquidy? Perhaps go through the recipe instructions and compare to what steps you’ve taken – if there is discrepancy, that might be the source of the problems. Good luck!!
August 13th, 2018 at 4:35 pm
Yum! I just made these today (a day later than we wanted them, but I neglected to read that they need to proof overnight or I would have started the process a day earlier). :D Delicious! We ate one today as garlic bread and tomorrow we’ll dip the second one in some very tasty olive oil I brought home as a souvenir from a trip to Spain! Thank you for sharing!
December 7th, 2019 at 5:16 am
Thanks for sharing this recipe. I’ve been baking breads for over ten years, and around every two months I bake half a dozen baguettes and fereeze them for family dinners when the grandchildren visit. I’ve been reasonably happy with my recipe, however kneading the dough for over ten minutes has always produced a really tight crumb.
I have been baking “no knead” breads all this time, paeticularly surdough no knead with ten grains and seeds. I noted that your recipe didnt involve kneading so decided to give it a try yesterday.
Early summer here in Sydney, with the temperature around 28c, humidity in the 80’s and the air thick with bushfire smoke. All the measurements and timings worked perfectly. I only had to keep an eye on proofing times allowing for the temperature and humidity. My wife declared … “best baguettes ever”. The search is over.
December 7th, 2019 at 11:53 am
Gavin – Wonderful! I love that this worked for you in a very different climate and altitude. Cheers!
March 31st, 2020 at 4:26 pm
Thanks for the recipe. I had a lot of fun making it. We’re currently on a coronavirus lockdown here in Brooklyn and I am out of white flour (well, saving it for my son’s birthday cake tomorrow) so made it with all whole wheat. I made Epis — in the end, sure, not very strong sourdough flavor because of the whole wheat, but they were shapely and delicious. I think the whole wheat just takes a bit longer to ‘crisp up.’ Didn’t have a spray bottle, so brushed water on instead and on the 2nd loaves I added a bit of sugar to the water to help them get a crunchy crust — which I think turned out great — although my wife prefers the regular ones with no hint of sweetness. Looking forward to doing it again with only 20% whole wheat!
One question — if the pearl of Levain doesn’t float in water — are you supposed to give it more time? Mine didn’t float — but the Levain was bubbly and alive so I just proceeded…All seemed to turn out well…
March 31st, 2020 at 8:04 pm
Dave – I’m glad the whole wheat versions turned out so well! And how nice of you to bake your son a birthday cake – that is going to be very special. So I think it’s possible that the pearl of levain may sink if in the process of trying to pinch a piece off, the bubbles get popped or it becomes deflated. If the levain itself looks bubbly and happy, it’s basically ready to go. So I think you did just fine. If the levain was without bubbles, then it needs more time for the yeast to feed and create carbon dioxide (which forms the bubbles). Stay well and safe! xo
April 8th, 2020 at 9:02 am
Hi Jen!
First off, I am a longtime reader and I absolute love your blog, the writing always speaks to me in some way or another. Since we’re all holed up inside I’ve been going crazy making sourdough baked goods and I want to give your epi a try!
I have a sourdough starter that I’ve had going for about a year now and I was planning to start making this recipe today. My starter is good to go and bubbly, but I have a question–since I’m not technically starting with the “Making the Levain” step, how many grams of active starter do I need to add? In short, what is the total gram weight of the levain that you eventually add to the bread ingredients? Is it just 38g flour + 38g flour + 8g starter = 84g, or does the fermentation lead to some loss/gain of mass? Sorry if this is a stupid question! Sourdough can be so mysterious :)
Thank you!
April 8th, 2020 at 9:26 am
Abilgail – Hi! Thanks for your note and I’m so happy to hear you’re cranking out the sourdough goodness :) Yes, 84g will do it to make approx 2 baguettes. More and more I’m led to believe that sourdough baking is pretty forgiving, so I think you have some flexibility there give or take 5 grams. Not a stupid question at all and I hope it works out!! xo
April 26th, 2020 at 9:48 pm
Where did you get your lame? Notice that it has a straight blade whereas mine is curved. Also, what is that cool tool that you use for the autolyse? (Am also a longtime reader, love your work!).
June 30th, 2020 at 3:46 pm
AnneG – So sorry that this got buried in my in-box! The lame came with a banneton that I ordered. I use both a straight one (seen here) and a curved one from Saint Germain Bakery. Sometimes I just grab the blade alone and score the bread. The mixer to stir dough is called a Danish dough whisk and I love it! Mine came from King Arthur Flour during a press junket, but you can find them for $8-$15 online or in cook stores.
August 24th, 2020 at 6:55 am
I am going to try this….I am searching for a baguette recipe without yeast. Could I use all purpose flour instead of bread flour?
August 24th, 2020 at 7:42 am
WK Beaudet – Yes, you can use AP flour. The difference is that bread flour has more protein in it than AP flour, for better gluten development, but AP flour works just fine.