


improvements
 Recipe: olive roasted garlic lemon rosemary sourdough crown
I hope everyone had a nice holiday season and enjoyed ringing in the new year! We kept things very low key here, because after all of the rush of holiday baking, package shipping, and making our Year in Photos digital card, I was over the holidays before they had even begun. Done with being social. Done with sweets. Done with being exhausted without the benefit of a proper workout. It was the culmination of several things, but two in particular: Yuki and tamoxifen. Ever since we got Yuki this summer, we’ve been active in puppy training, but not active in that day-long big hike or backpacking adventure or even trail running way. Then I went off of tamoxifen in September, and I think I may have gained some (additional) weight as a result of that. I just felt completely shitty.
Enough, I decided. Time to put my health first. I started working out daily either skate skiing, uphill skiing, or indoor training. It coincided perfectly with the holidays because all I remember was exercising hard, sleeping a lot, and feeling really tired. This is how I kick myself out of a funk, and I definitely felt better and more like myself after a week.
enjoying the views and getting my fitness back on the nordic trails

skiing beaver creek

We also shifted Yuki’s winter training into high gear. Jeremy really liked the idea of skiing with our dogs, but he dreaded sacrificing ski days to get the pups sorted out. Contrary to what people think, training our pups involves a lot of untangling of leashes, stopping to adjust harnesses or booties, yelling, and very little actual skiing. On the one hand we have Neva who, while adjusting well to her “calm down” meds, is still highly excitable and reactive when outside. On the other hand we have Yuki who wants to jump on Neva’s head, jump off the track into the deep snow, and bark at/hide from unfamiliar people and random plants. It’s a bit of a clusterfuck, but we got it sorted out! Yuki is a great little ski pup, although she runs out of gas much faster than Neva. We’ll see if it’s just age and fitness or if she’s simply a short-distance runner.
jeremy skates with both dogs (but one-on-one is much better)

uphill skiing with the pups

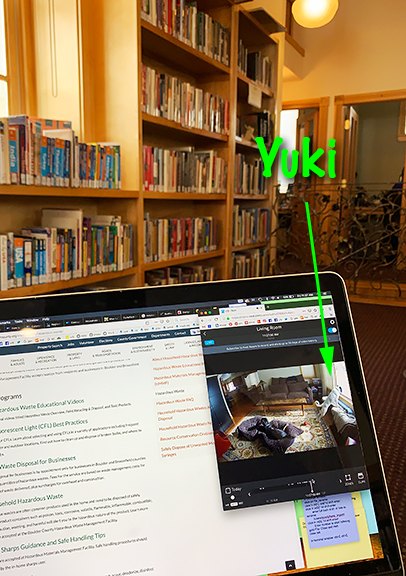
One major part of Yuki’s training was Free Range Yuki. Whenever we left the house, Yuki went into her crate and we cordoned off the main room so Neva would always be in plain view. It makes Yuki incredibly upset if Neva is out of her sight because how else can you be the boss of someone? If we crated Yuki with a mat or blanket, she would chew and ingest said mat or blanket. I felt at 11 months, it was time for Yuki to transition from the crate to Free Range Yuki, because we wanted more freedom for us as well as for her. We started by setting up a web cam in the main room and leaving the house for 30 minutes. We just sat in the car in the driveway and monitored the pups. Neva was fine, Yuki was puzzled, but settled down after 25 minutes. Over the past couple of weeks, we’ve increased the time away as well as gone to various local hangouts within a 10 minute drive to work and observe the pups. Yuki is much better behaved when we are not around. She and Neva sleep or look out the window or grab a drink of water, but otherwise they are super chill. Yuki can be a bratty and bossy little sister to Neva when we are home, but when we’re not in the house, she looks to Neva for comfort and companionship.
watching yuki from the crested butte public library
Of course, just as things started to find a rhythm, I caught a cold last week. I’m finally on the mend, but this was not the way I wanted to lose weight. There’s nothing like being sick to remind you to take advantage of feeling good when you can.
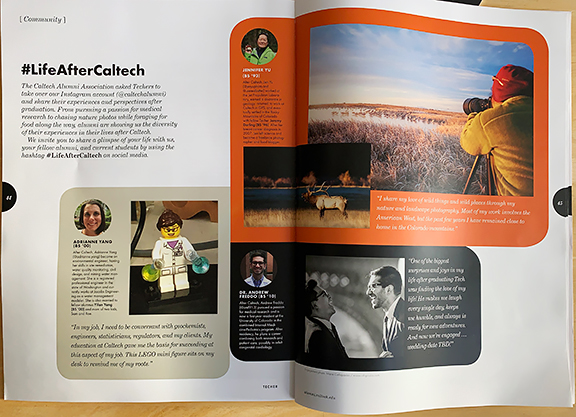
And on an unrelated note, I found myself in the pages of the 2019 Caltech Alumni Association’s magazine. If you know anything about my alma mater, then you will understand when I say that I never expected to see a mention of me except possibly on the occasion of my passing (which I’d never see). I’m saving a copy for my mom.
who says nothing good comes from social media
There happens to be a recipe for you after all that yada yada. While Jeremy would be perfectly content if I only ever made sourdough baguettes, I personally enjoy bread with mix-ins. In today’s case, it is sourdough bread with roasted garlic and olives. But it doesn’t stop there! Years ago I fell in love with a sourdough crown that I used to purchase from Cured in Boulder. It was topped with olive oil, sea salt, rosemary, and lemon zest. How lovely to turn an already extraordinary roasted garlic and olive boule into a crown adorned with all of those goodies. Shall we?
the bread: sourdough levain, water, olive oil, bread flour, whole wheat flour, olives, salt, (more) water, and garlic

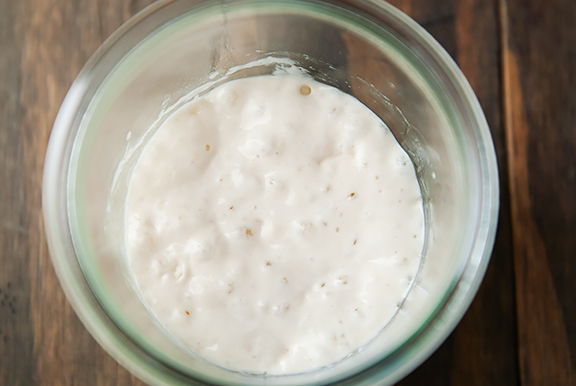
If you are new to sourdough baking, it’s important to point out that making sourdough bread is not a quick process and requires a little bit of planning on your part. I start by mixing my levain the night before I make and shape the dough. To make the levain, you need some well-fed starter, which for me means feeding my starter the morning before the night I feed the levain. 8-12 hours after feeding usually results in a happily bubbly starter. My kitchen is cold overnight (about 55°F in winter), so I try to give the levain 12 hours to become active and full of bubbles by the time I’m ready to start the dough the following morning. Bubbles are a sign that the wild yeast are doing their job – eating and producing carbon dioxide. The levain should float in water.
the levain is ready
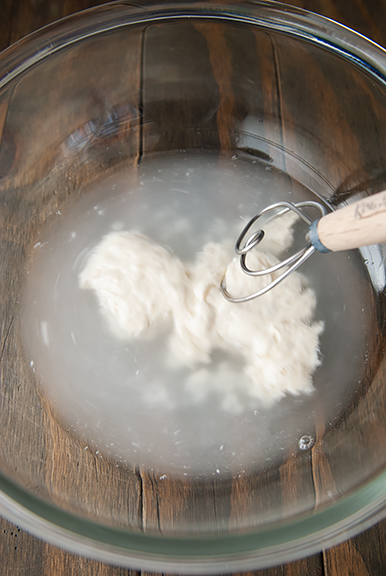
dissolve the levain in water
add your flours
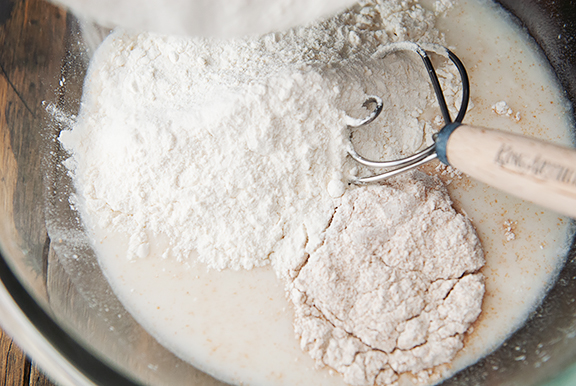
mix until there are no dry pockets of flour and the dough is shaggy
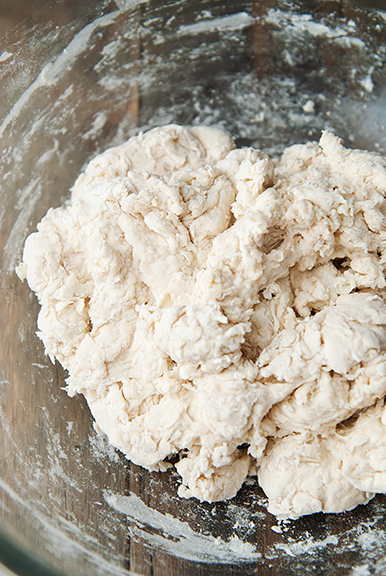
After I mix the dough, I let it autolyse covered for four hours (you could do this for as little as an hour). Autolysing allows the flours to absorb the water. During that time, I roast the garlic and chop the olives.
cut off the tops of the garlic bulbs

drizzle olive oil over the tops

bake until cloves are soft

chopped olives and peeled roasted garlic cloves

When the dough is done autolysing, dissolve the salt in water and pour it over the dough. Pinch and squeeze the dough until all of the liquid has been incorporated into the dough. The dough will be sticky and messy and seem to barely come together. Don’t worry – it will. Instead of kneading the bread, you will make turns. Start by pulling the far end of the dough up and over toward you and tucking in to the edge closest to you. Give the bowl a 90-degree turn and repeat until you have folded the dough four times. This is one turn. Cover the dough and let it rest for 30 minutes. You will turn the dough 6 times in total.
stir the salt in water until dissolved

pinch and squeeze the salt water into the dough

pull the far end of the dough up…

and tuck it into the edge of dough nearest you

As you prepare for the second turn, add your mix-ins to the dough. Turn as you did the first time and don’t worry about the bits that keep tumbling out of the dough. I just poke them back in randomly. They will distribute better as you progress with the turns. Cover and let the dough rest for another 30 minutes. Repeat the turns and rests until the sixth turn, at which point you cover the dough and let it rest for an hour. Turn the dough out onto a floured surface and shape it into a round by sliding a pastry cutter tool at a shallow angle in a counterclockwise motion around the base of the dough. This motion will pull the edges tight and make the dough more tidy. Continue to do this until you have a nice round of dough. Rest the dough, covered, for 20-30 minutes. While the dough rests, generously flour your banneton linen (or the banneton itself if not using a linen) or your towel-lined bowl. If the linen or towel are new, then be sure to rub the flour into the weave as this helps to prevent the dough from sticking to the fabric. After the dough has rested, flour the top and turn it upside down. Grab the top, bottom, left, and right sides of the dough and gather them to the center, then tip the dough into the basket with the gathered point facing up. Flour the dough once more and cover with plastic. I use a 2-gallon ziploc bag.
add the olives and garlic cloves

turn the dough

shape into a round

cover and rest

place in a banneton and cover in plastic to proof

You can proof at room temperature for a few hours or go for a slow cold proof in the refrigerator overnight up to 2 days, which develops more flavor in the bread. I generally proof in the refrigerator for 24 hours. After proofing, preheat your Dutch oven with the lid on in the oven and give it extra time (like 20 minutes or more) after the oven comes to temperature. This is to account for the thermal inertia of the Dutch oven which won’t warm up as quickly as the oven air temperature. I take my dough out of the refrigerator right as I am ready to pop it into the oven. First I invert the dough onto a square of parchment paper (do not use wax paper) which makes lowering the dough into the very hot Dutch oven much less dangerous and/or disastrous if you hold the corners of the parchment paper. Next I score the dough with a lame or a sharp knife. Normally I’d tell you to make whatever pattern suits your fancy, but for a crown, it helps very much to make this starbust-like pattern (two crosses offset by 45 degrees) because the center will expand to a broad surface to hold the toppings, and the cut areas will absorb the olive oil nicely. Quickly and carefully remove the Dutch oven from the oven, remove the lid, lower the dough into the Dutch oven, spritz with some water from a spray bottle (optional, but good to encourage a nice crust), replace the lid, and pop the whole thing back into the oven.
right out of cold proof

scoring

While the bread bakes, prepare the toppings. You can use whatever you like, but this combination of fresh rosemary, lemon zest, sea salt, and olive oil is both warming and bright. I definitely recommend flake sea salt for the aesthetics and for that lovely crunchy texture.
olive oil, rosemary, sea salt, lemon

prepped with a few lemon slices for garnish

After 30 minutes, the lid comes off the Dutch oven. This is when I add the toppings to the crown. I drizzle the olive oil over all of the split surfaces first, because it helps the rest of the toppings to stick to the loaf. Then I sprinkle the salt, rosemary, and lemon zest. The lemon slices are optional, but I like the look of them on the final crown. Then it’s back to the oven they go for the final browning.
drizzle the olive oil first so the other toppings stick to the bread

finish with the rest of the toppings

The end result is a roughly 2-pound sourdough crown dotted with savory bites of briny olives and earthy, sweet roasted garlic. The toppings add a nice flavor, but if you really like rosemary, you could toss some into the mix-ins in case the bits sprinkled on top aren’t enough for you. Same goes for the lemon zest. This is my favorite sourdough bake to date!
i like a deep-colored crust

treasures await

Olive Roasted Garlic Lemon Rosemary Sourdough Crown
[print recipe]
levain
10g ripe (fed) sourdough starter
45g bread flour
45g water
mix-ins
3 bulbs garlic
olive oil
1 cup kalamata olives, sliced
dough
levain (see above)
10 oz. water
395g bread flour
45g whole wheat flour
10g sea salt
1.25 oz water
toppings
1/4 cup olive oil
1 tbsp fresh rosemary, coarsely chopped
zest of 1 lemon, grated (about 1 tbsp)
2 tsps flake sea salt
3 lemon slices, for garnish
Prepare the levain: The night before you make the bread dough, prepare your levain. Mix the starter, water, and bread flour together until no pockets of dry flour remain. Cover and let sit overnight on the counter, about 8-12 hours. The levain is ready when it is bubbly and an unstirred dollop floats in water.
Prepare the mix-ins: You can do this in advance or the same day as the dough, just make sure everything is ready before your second turn of the dough. Preheat oven to 400°F. Peel away the excess papers on each bulb of garlic. Slice the top 1/4-inch off of each bulb. Set the bulbs right-side up in a small ovenproof vessel and drizzle with 1 teaspoon of olive oil per bulb. Cover the vessel with foil and bake for 30-40 minutes (mine took 1 hour) until the cloves are soft. Remove from oven and let cool. Squeeze out or peel the roasted cloves of garlic and discard the papers.
Make the dough: Dissolve all of the levain into 10 ounces of the water. Stir in the bread flour and whole wheat flour until the dough is shaggy. Cover the dough and let it rest (autolyse) for 1-4 hours. Dissolve the 10 grams of sea salt in 1.25 ounces of water. Pour the salt water over the dough and pinch and squeeze the dough until the water is fully incorporated and the dough is sticky.
Turn the dough: Facing your dough, grab the edge of the dough farthest from you, pull it up and toward you and tuck it down over the edge of the dough closest to you. Rotate your bowl 90 degrees (clockwise or counterclockwise is fine, just be consistent throughout) and repeat. Continue to do this until you return to your starting point (or have folded the dough 4 times). That is one turn. Let the dough rest covered for 30 minutes.
Add the mix-ins: Add the roasted garlic cloves and chopped olives to the dough and then perform turn #2 (folding the dough 4 times). Don’t worry if the fillings clump together. They will distribute as you go through more turns. Let the dough rest covered for 30 minutes. Repeat the turns 4 more times for a total of 6 turns. After the the 6th turn, allow the dough to rest for 30-60 minutes (I rest for 60 minutes). The dough should be larger, but it won’t be doubled in size. As you turn and rest the dough, it should also become more cohesive and elastic and smooth. If olives or garlic pop out during the turns, just poke them back into the dough.
Shape the dough: Turn the dough out onto a floured work surface. Sprinkle flour over the dough. Slide the flat end of a pastry scraper under one side of the dough and slide it counterclockwise in an arc to shape the dough into a rough round. Continue to do this until the dough is roughly a round blob. Let the dough rest for 20-30 minutes. Dust your proofing basket linen or the basket itself with plenty of flour. [If your basket linen is new, rub plenty of flour into the bottom and sides of the linen.] Sprinkle flour over the dough. Flip the dough over and grab the top edge and pull it up and over to the center of the dough. Turn the dough 90 degrees and repeat until all four edges have been pulled to the center. Turn the dough right-side up, dust with flour, then tip the loaf into your proofing basket upside down (the seams should be facing you). Dust the loaf with flour.
Proof the dough: Cover the basket loosely with plastic and allow to rise for 3-4 hours at room temperature or place the basket in a clean plastic bag or large (like 2 gallon) ziploc, tie or seal off, and rise in the refrigerator overnight for 12-24 hours. I personally prefer the 24 hour cold rise.
Bake: Make sure your Dutch oven is wide enough to accommodate your dough. Place the Dutch oven with the lid in your oven. Preheat 500°F. I give the Dutch oven another 20-30 minutes in the oven once temperature is reached. Lay a sheet of parchment paper (NOT WAX PAPER) that is several inches bigger than your dough footprint on a cutting board. Tip your dough out of the basket, seam side down, onto the center of the parchment paper. If you proofed your dough overnight, you can go straight from the refrigerator to the parchment. Score your loaf with a sharp knife or a lame in a straight line from the edge opposite you toward the edge closest to you. Turn the dough 90° and score the loaf from the edge opposite you to the center. Turn the dough 180° and repeat. You should now have a cross. Now make similar scores at 45° (between the lines of the cross) toward the center so you have a final starburst or crown pattern. Move the board-parchment-dough ensemble next to your oven. Take the Dutch oven out of the oven, remove the lid, grab the edges of the parchment paper (making sure not to lose your dough) and quickly but CAREFULLY lower the dough and parchment into the Dutch oven. You can spritz the dough with some water from a spray bottle to aid in the development of a nice crust. Cover with the lid and return to the oven. Bake 20 minutes. Reduce oven temperature to 450°F. Bake 10 minutes.
Garnish with toppings: Take the Dutch oven out of the oven and remove the lid. At this point I usually take the bread and parchment paper out, place a shallow ovenproof cooling rack in the Dutch oven, then replace the bread and parchment on top of the cooling rack to prevent excess browning of the base. Drizzle the olive oil over the crown, especially over the open areas that had been scored (they soak up the oil nicely), then sprinkle the rosemary, lemon zest, and flake sea salt over the crown. Top with decorative lemon slices (optional). Return the Dutch oven with the crown to the oven and bake for another 15-25 minutes until the crust is dark golden (you can turn the bread halfway through for even browning). Remove the bread from the Dutch oven with a spatula and allow to cool completely on a cooling rack before slicing. Makes one 2-pound loaf.

more goodness from the use real butter archives

|
sourdough bread |

|
sourdough pizza |

|
cranberry walnut pepita sourdough boule |

|
sourdough waffles |

January 17th, 2019 at 5:48 am
Glad you are on the mend and back! This bread looks soooo good! I really meant to dive into the sourdough this summer but, somehow, I did not. The girl child got a job as a faculty librarian at a local college, so maybe I can entice her back to the house for adventures in sourdough baking this coming summer when she has more time. How nice that Yuki behaves better when you are not home. I kind of think our cats behave the same whether we are home or not…I know I never find them cuddling. One will be on top of the comforter at the foot of our bed, and the other will get under it so she can enjoy the comforter but pretend he isn’t there. Dorks.
January 17th, 2019 at 5:49 am
P.S. I meant to say how much I appreciate the detailed explanation and so many photos. I was reading and THINKING I knew what you meant, and then would scroll down to find a handy photo. I am sure it was a lot of work putting this post together, but your effort makes it so much more likely that I will feel confident to try this once I get my sourdough going.
January 17th, 2019 at 8:00 am
Look at you, even a special little tool for scoring the bread! Love it. Thank you so much for sharing your photos, recipes, experiences. I enjoy living vicariously. And such an honor to be recognized in #LifeAfterCalTech! Good to know that you are as real as the rest of us, and leashes get tangled, etc! Life after Tamoxifen. Been there done that. Curious about how many years you had to do of that torture. I did 5 and then 5 more of Femara. Your pup cam is a hoot, and your explanation of their personalities priceless. #LuckyDogs! xoxo, jill
January 17th, 2019 at 3:54 pm
Oh Yuki Yuki Yuki!
January 18th, 2019 at 4:40 pm
So excited to happen upon this recipe, a perfect celebration for my starter’s first birthday. Just coming out of the oven in a minute, smells so delicious! Thanks for a great post!
January 22nd, 2019 at 7:53 am
I’m so glad you took the time to get back in a routine and take care of your health (even with the stupid cold throwing you off course temporarily). I smiled when you said that even a week of that had you pulling out of a funk and feeling more like you – that’s absolutely what works for me, too. And I’ve finally gotten to where I don’t let myself forget that. :)
January 29th, 2019 at 8:36 am
I discovered the joys of sourdough this year after 20 years of wondering what all the fuss is about. I made my own starter, largely inspired by you. Thank you for inspiring my sourdough adventures! I’ve mastered naturally leavened bread, cinnamon rolls, and Schnecken, a local holiday favorite pastry that is kind of like a super buttery large cinnamon roll with a few raisins here and there. Fabulous and now a family favorite — all made with my own sourdough starter. Now, I think I’ll work on your yummy garlic/olive boule. I love the all day and longer process of sourdough! It’s my favorite part of baking with it.
Please take care of yourself! We women often lose sight of how important a puzzle piece we are in the larger picture of our family, friends, and loved-ones, both the two footed and four footed kind. :)
February 7th, 2019 at 11:44 am
Kristin – Sourdough is one of those things I had long wanted to try and never took the plunge until last year. It’s worth trying, and if you don’t like it, it’s okay to let the starter go (just harder once you’ve named it – ha ha!). It’s also great to have friends who also bake sourdough, because you can ask each other questions and get help :)
jill – Ten years total on Tamoxifen. I’m just glad I don’t have to keep track of a daily medication because it’s not such a big deal if I double dose or forget my vitamins!
Carole – :)
Valerie – Yay!!! I hope it was lovely <3
Mel - Right? I don't know if it works this way for everyone, but I like "boot camp" to kick my butt in gear. I feel so much better and so much more functional when I can get back on track. I know you are the same, which is probably one of the many reasons I love you xoxo
Nan - WOW!!! That sounds amazing and how awesome that you made your own starter! And thank you for the reminder, because I think you are absolutely correct. I know that was true of my grandma and is true of my mom. I will be more mindful of it <3 xo
May 20th, 2020 at 7:45 pm
Hi!
Great recipe! I was wondering if I can refrigerate the Levain…. my timing was a little off so I wanted to put it in the fridge till tomorrow morning and then take it out and bring it to room temp before I use it.
Just wondering if that would be okay.
May 20th, 2020 at 8:36 pm
Damini – I’ve never tried that before, but it should work as long as the levain looks bubbly and active when you bring it back to room temperature. Good luck!
December 21st, 2020 at 9:18 am
I saved this recipe for the very same reason that you decided to create your version of the crown bread from Cured. I love that loaf. As I understand, the bread was made by the French baker from The Med- he would also sell bread out of the side door of The Med for those who were in “the know”. Sadly The Med has closed along with many long time Boulder eateries- so sad for all.
December 21st, 2020 at 6:45 pm
Loved making this on a quiet weekend! My favorite outcome of the dozen or so i’ve tried of sourdough loaves. A very happy dough too! Smells and looks worthy of gift giving.
January 7th, 2021 at 9:23 am
Melinda – I was also very saddened to read that The Med group had closed. We should “toast” the baker every time we make this beautiful crown! xo
Allie – So happy to hear it! Be well, my dear. xo
August 9th, 2022 at 1:32 pm
Everything in grams?
C’mon