


all the dough in the world

Last week felt like proper winter for once. We had two powder days, cold temperatures, and great skiing on the mountain and the Nordic trails. I had almost forgotten what a real ski season is like! A real ski season is like butter. Smooth, silky, fluffy, cold, snowy butter…
jeremy grabs some powder runs before a meeting

hello winter, nice of you to come by!

It was also the perfect time to be experimenting with bread baking and running a hot oven. Baking sourdough bread has been on my List of Stuff and Things for over a decade. My greatest impediment was my fear of the unknown. You mean you have to CARE for sourdough starter? As in, keep it alive?!? How many times do we put off doing something because we can’t seem to overcome the activation energy (mental or otherwise) required to get going? And how many times, after we finally get around to doing it, do we kick ourselves for not doing it sooner now that we know it wasn’t such a big deal after all? I do not possess enough hands to raise for all the times I psyched myself out of awesome things, but I am learning that sometimes we need to simply get out of our own way.
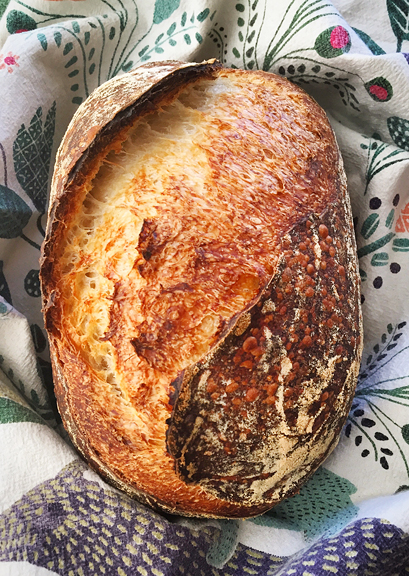
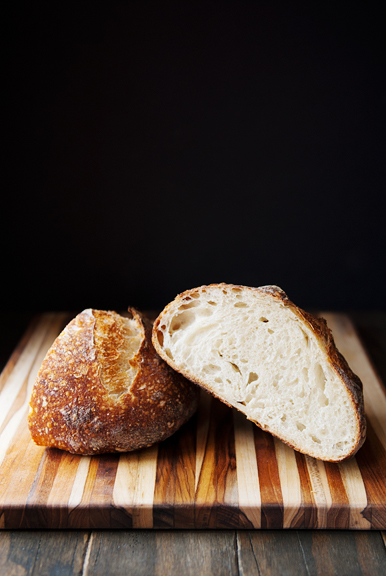
i baked some bread
Over the last couple of years I’ve admired my friend, Dawn, as she cranked out artisan pizzas, breads, pastries, and a host of other goodies. She grew and milled her own wheat! Dawn is one of my real life girl crushes because she’s badass and wonderful and rescues abandoned pups in the mountains left for dead by jerks. So it made sense that I would ask her for some sourdough starter in the hopes that her awesomeness would accompany the starter into my kitchen. In the last two weeks, I’ve given starter and Dawn’s Starter Care Guide to two other friends. Bread is for sharing! Once I saw how straightforward it is to feed and maintain my starter (I named it Wheatley) without killing it, I went in search of a sourdough bread recipe. My absolute favorite sourdough comes from Tartine Bakery in San Francisco and the recipe I used from The Kitchn is adapted from Tartine’s method, but for the home baker.
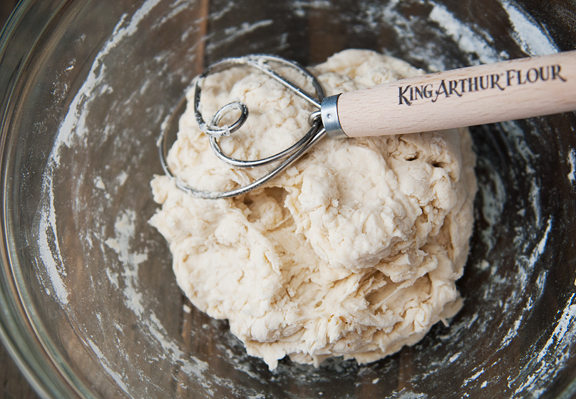
sourdough starter, water, water, flour, flour, salt

It blows my mind just a little (okay, a lot) that you can transform water, flour, and salt into a deep golden loaf of perfection. Whether you purchase, receive, or make your own sourdough starter, what you have in your jar is wild yeast that requires regular feeding. Feeding basically means stirring in equal weights of water and flour. [Note: While some may insist that I’ll have to pry their measuring cups from their cold dead hands, a kitchen scale eliminates the inaccuracies of volumetric measurements.] As the little yeasties digest the sugars in their food and produce energy by the process of fermentation, they create byproducts of carbon dioxide and ethanol. The carbon dioxide forms bubbles in your starter. That’s how you know it’s alive and active.
If you don’t feed your starter, it will eventually die. This was my biggest hangup with baking sourdough bread – was I going to kill my starter? Thankfully, you don’t have to babysit your starter daily if you don’t want to or are unable to. The lower temperature of the refrigerator slows the metabolism of the yeast such that a single feeding can sustain the organisms for a week or more. And if you are going to be away from your starter for longer than a few weeks, you can always make a backup. But a healthy and active starter should probably hang out on your kitchen counter at room temperature, receiving regular feedings for a few consecutive days, before making your bread. I typically feed my starter in the morning, and it is ready for use about 8 hours later.
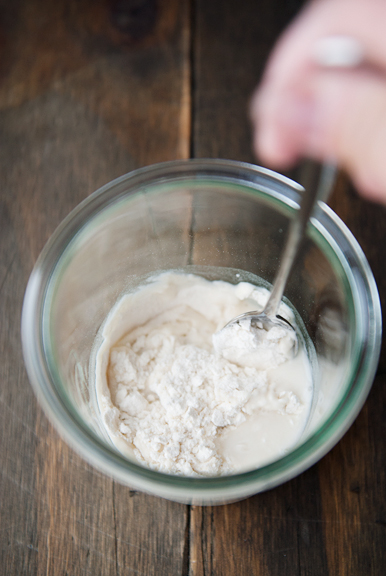
The recipe I followed makes two 1-pound loaves of sourdough and calls for one tablespoon of starter. I halved the recipe and used a half tablespoon or 8 grams of starter. The starter gets mixed with flour and water and is left to feed overnight. This is the levain (leaven) – the stuff that makes your bread rise. As our municipal water is treated with chlorine, I use purified water for the levain (there is always some leftover from my kombucha-making) as I don’t want to kill my baby yeasts. Alternatively, I could let my tap water sit out for a day as chlorine is pretty volatile and will evaporate naturally.
weighing the water for the levain

mixing the levain
bubbly the next day

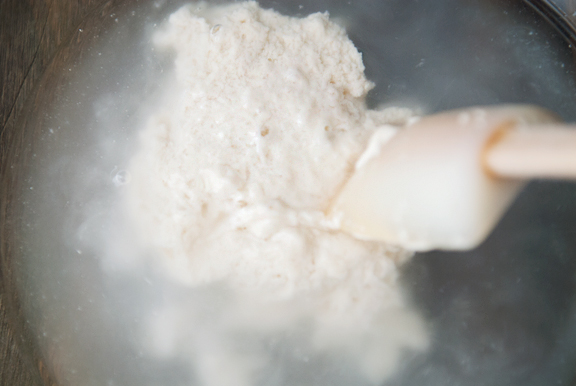
The levain should be bubbly and light and expanded the next day. I usually give it a sniff to make sure it’s a little sour smelling, a little alcoholy. Is it bad that I like sniffing sourdough starter? You can take a small spoonful of levain and drop it into water. If it floats, it’s ready to use. Stir the levain into the water until it is dissolved, then mix in the flour. You can use all-purpose flour or bread flour. I accidentally used all-purpose flour on my first attempt and then made sure to use bread flour on the second attempt. The bread flour dough was easier to work with, and I think the texture and flavor were better than the all-purpose flour loaf too. Also, if you have a Danish dough whisk languishing away in a drawer somewhere (like me), this is the perfect time to use it. It incorporates the flour so easily and quickly! The dough should look like a shaggy mess with no dry pockets of flour remaining.
Now let that shaggy mess rest for 30 minutes to 4 hours. This process, called autolyse, allows the flour to absorb the water and begins gluten development. I let mine rest for 4 hours (and went skate skiing on the local Nordic trails). And because I never know which factors of my kitchen (high altitude, cold, aridity, etc.) are going to impede my culinary endeavors, I cover the bowl with plastic wrap rather than a kitchen towel to prevent the dough from drying out, and I set the bowl atop the refrigerator where it is slightly warmer and out of Neva’s reach.
dissolve the levain in water
add the flour
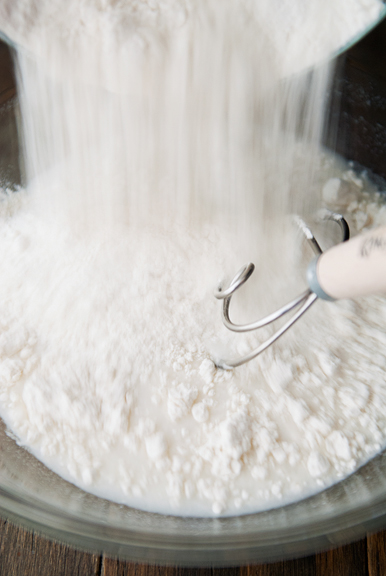
mix it into a shaggy dough
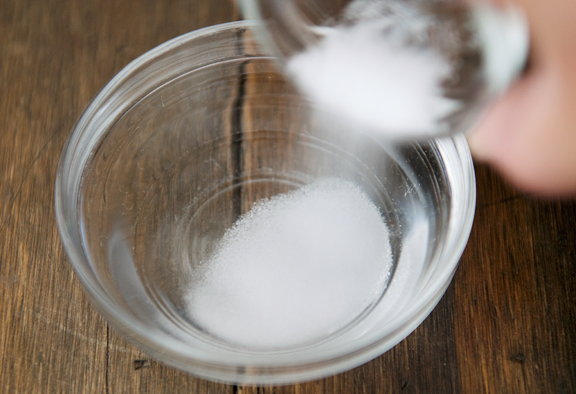
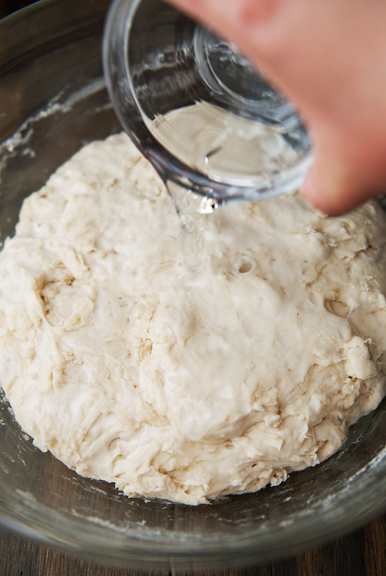
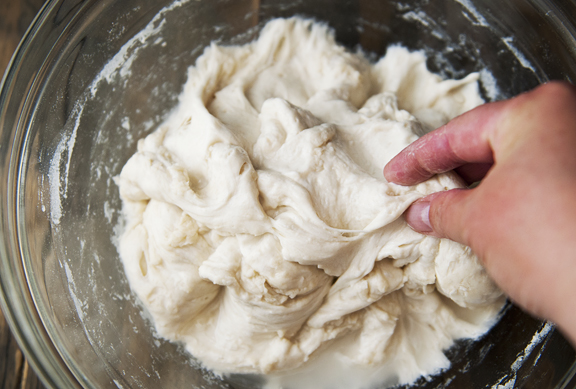
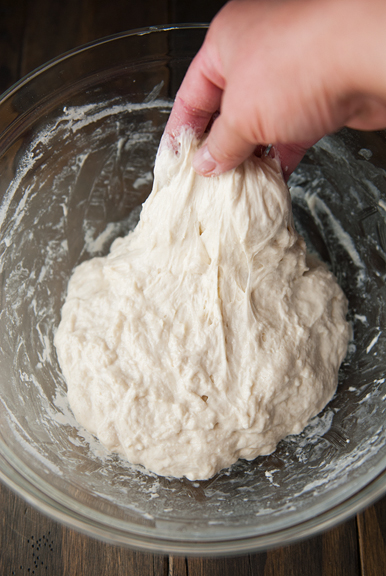
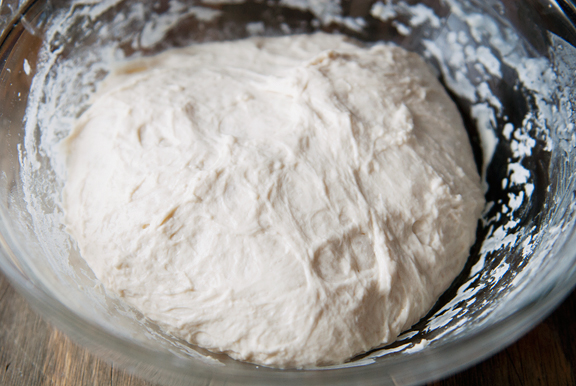
My dough was still a shaggy mess after four hours, but it was a larger, puffy shaggy mess – success! The recipe instructs you to dissolve salt in the remaining water before the autolyse, but I can lose quite a bit of water to evaporation that way. You can either cover the salt water for the duration of the autolyse step or mix it right before its addition to the dough. Incorporate the salt water by pinching and squeezing the dough. Like many things in life, it might not look like it’s working at first, but if you keep at it, you will eventually achieve a sticky, wet dough. Perfect.
dissolve salt in water
pour the salt water over your dough
pinch and squeeze the water into the dough
Now perform the first turn of six. Facing the dough in the bowl, grab the edge of the dough farthest from you (I call it North), pull it up and down over the dough to the edge closest to you (call it South) and tuck it in on the southern edge. Turn the bowl 90 degrees clockwise (or counterclockwise, just be consistent) and repeat the fold. Continue until you have done four folds. That’s one turn. The purpose of the turn is to stimulate the yeast, introduce more air, and help with gluten formation. Allow the dough to rest for 30 minutes. Repeat for a total of six turns. My dough became progressively smoother, more elastic, and easier to work with after each turn and rest. When you finish the last turn, rest your dough for 30-60 minutes (I let it rest 60 minutes).
pull the dough from one edge
fold it over to the other edge
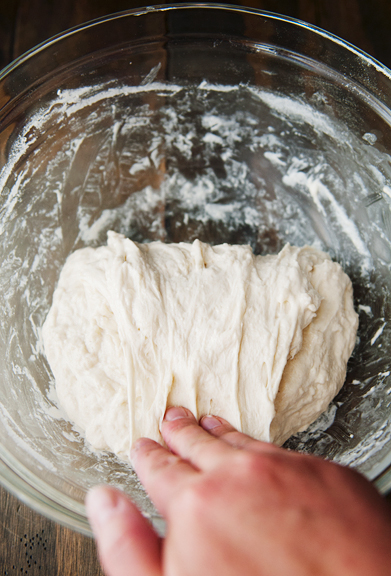
resting the dough after the last turn
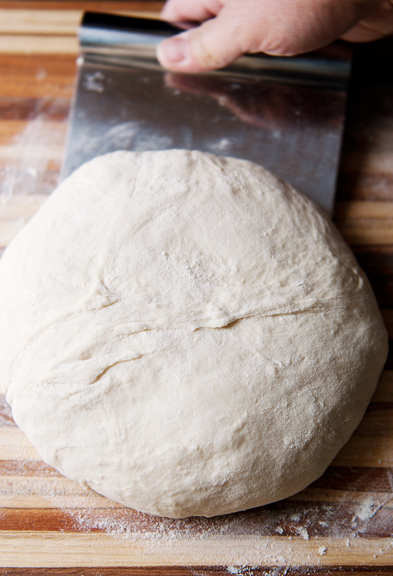
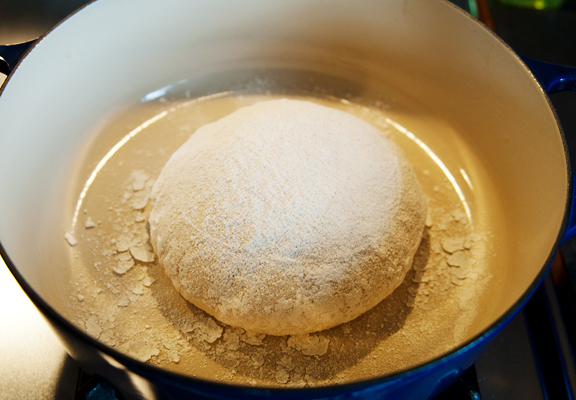
Turn your dough out onto a floured work surface and sprinkle more flour over the dough. If you were making the original recipe from The Kitchn, you would cut your dough in half and shape two loaves. Since I made a half recipe, I shaped the one loaf. The dough is still quite sticky at this point, so it helps to use a pastry scraper. Slide the scraper flat, under one edge of the dough, almost parallel to the plane of the work surface. Now sweep the scraper in an arc to the left. Continue sweeping to the left, shaping the dough into a round. Rest the dough for 20-30 minutes.
turn the dough out onto a floured work surface
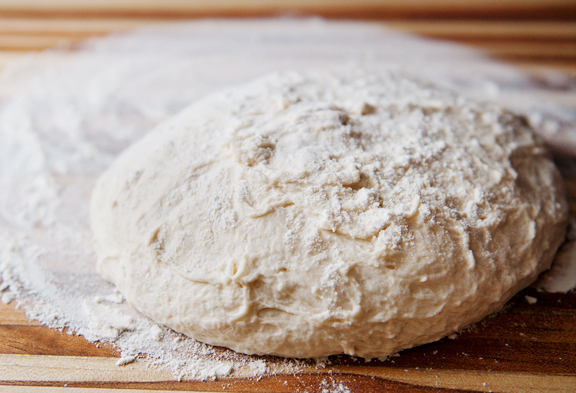
use a pastry scraper to shape the dough into a round
While the dough rests, it’s a good time to prep your proofing vessel. I use a 10-inch diameter round proofing basket (rattan banneton, brotform) lined with a linen cloth, but you can employ a large bowl lined with a well-floured kitchen towel. I chose 10-inches because it has the capacity for a 2-pound loaf of bread, but can easily accommodate a smaller loaf, and because it fits in my 12-inch diameter Dutch oven. I also have a 10-inch long oval proofing basket because I prefer bâtards to boules. If your proofing linen is new, it helps to rub flour into the fabric weave on the bottom and along the sides and then dust more flour over that. The more you use it, the less your dough should stick to the linen, kind of like the way cast iron skillets work. In between uses, you can tap out the excess flour and store the basket until the next proofing. The care instructions on my basket say to avoid washing the linen unless necessary, and to use cold water and hang dry the linen if you do wash it.
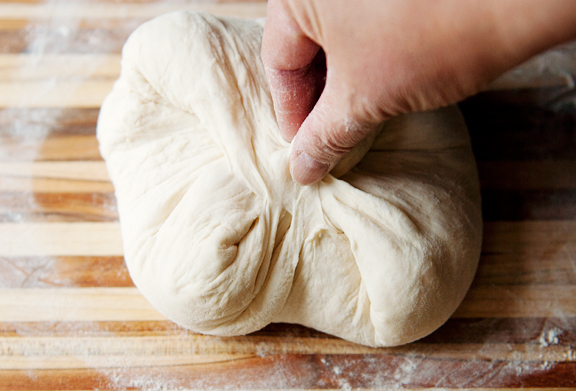
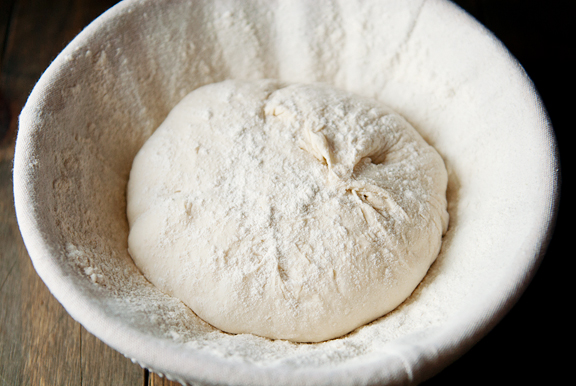
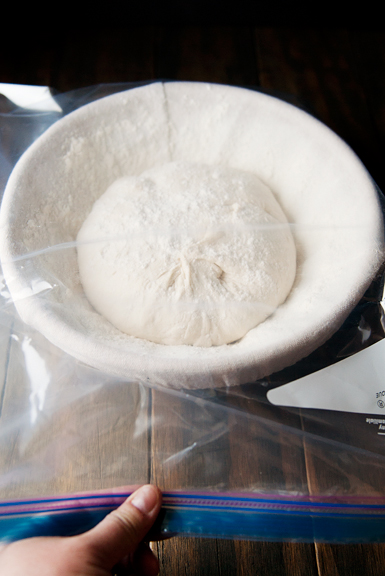
After the dough is rested, gently flip it over and gather the four “corners” of the dough to the center. Pinch them together and set the dough, pinched-side up, in your proofing vessel. Dust a little flour on top. At this point, you can cover the proofing bowl and let the dough rise at room temperature for 3-4 hours or you can go for a longer cold proof in the refrigerator overnight. I like cold proofing because it develops better flavor in the bread. I slip my proofing basket into a 2-gallon ziploc bag (it won’t fit in the 1-gallon, believe me, I tried), seal it, and let the dough hang out in the refrigerator for 12-15 hours. I have read that some folks proof as much as 24 hours. Oh, and you don’t have to use a giant ziploc, you can use any clean plastic bag.
final shaping: turn the dough over and gather the edges to the center
place the dough in the proofing vessel
seal in plastic for cold proofing (or cover loosely for room temperature proofing)
I have only baked my sourdough breads in a Dutch oven, so I can’t speak to how you should go about baking bread without one. If you don’t have access to a Dutch oven, don’t fret – my friend used a stainless steel stock pot with great success. The purpose of the Dutch oven or any oven-safe pot with a lid is that the moisture released from the bread during baking creates a little steam room for the bread. So pick out the oven-safe pot you plan to use (make sure it is big enough to fit your dough!) and put it on the center rack of your oven, and crank the oven to 500°F. I let my Dutch oven heat for another 30 minutes after the oven itself reaches target temperature, thermal capacities of Le Creuset cookware being what they are.
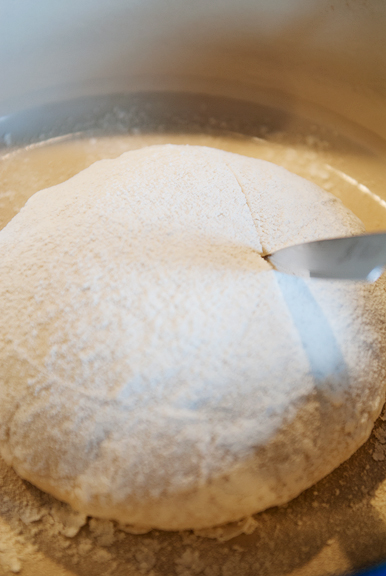
For my first loaf, I turned the dough straight from the refrigerator into the Dutch oven. Flip it out so the seams are on the bottom. Since then I’ve begun to flip the dough onto parchment paper (NOT wax paper) first, because it makes life so much easier. Once the dough is out of the proofing basket, score it with a sharp knife or a lame. Make your incisions at a shallow angle, trying to keep the blade as close to parallel to the plane of the bread as you can. I used a knife the first time and have moved on to a lame – basically a razor on a stick. Scoring controls the direction in which the bread expands during baking, but it is also a nice way to pretty up your breads. Scoring the bread while it is in a burning hot Dutch oven is courting injury, if you ask me. That’s another reason I like to plop my dough onto parchment paper first. Then it’s easy enough to pick up the dough by the edges of the paper and lower it into the center of your Dutch oven. Parchment also makes for easier cleanup. Cover the pot with the lid and slide it into the oven to bake.
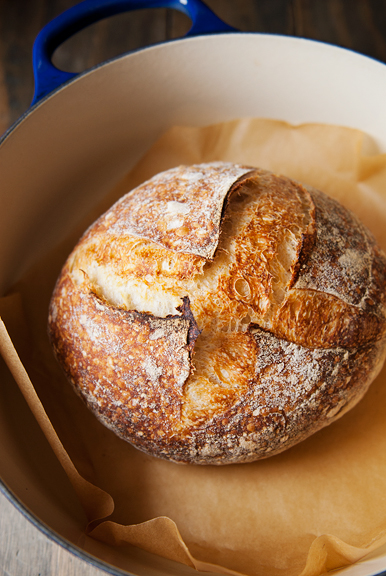
The bread bakes covered at 500°F for 20 minutes, then you reduce the oven temperature to 450°F and bake another 10 minutes. Once the baking phase is done, remove the lid and let the crust of the bread mature into a deep golden brown. I like my bread on the verge of being burnt. It has more complex flavor and better texture. Too many bakeries and grocery stores churn out underbaked breads and it makes me weep. When the bread is ready, take the Dutch oven out of the oven, remove the bread from the pot (I use an oven mitt and a fish spatula), and immediately set it on a cooling rack. While it’s tempting to tuck into a freshly baked loaf of bread, let it cool completely before cutting it.
into the hot dutch oven
scoring with a knife (or use a lame)
my baked second loaf, this time with parchment paper
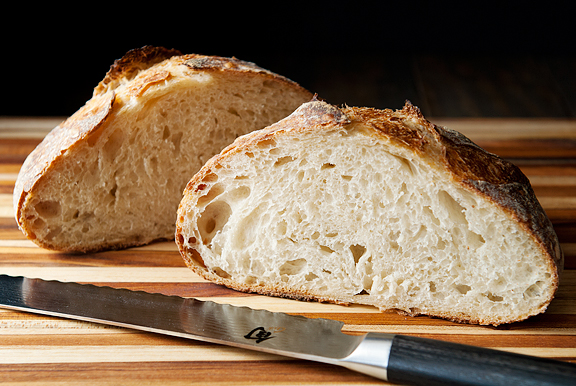
My first loaf was surprisingly good, despite using all-purpose flour. The crust was flavorful, crisp, chewy. The interior crumb was tender, but maintained some nice chew and had a good sour taste. I don’t like dense bread, but I also dislike super airy sourdough with giant holes because they are terrible for sandwiches and they leak melted butter. The density of my loaf was near perfect for my tastes. It could have been a touch airier. I dialed it in with my second loaf which used bread flour instead of all-purpose flour. But what a relief and a joy to have finally made my own sourdough! I appreciate good bread, but no amount of money can buy me the satisfaction of knowing how to make my own bread – especially when it is just how I like it.
total game changer
we are going to make many beautiful sandwiches together
Sourdough Bread
[print recipe]
from The Kitchn’s adaptation from Tartine
I’ve written up the recipe for a single 1-pound loaf of sourdough bread, which is half of the original recipe which makes two 1-pound loaves.
levain
1/2 tbsp (8g) active sourdough starter
38g (1/4 cup) bread flour or all-purpose flour
38g (1/6 cup) water
dough
265g (9 oz.) water, room temperature
350g (2 3/4 cups) bread flour or all-purpose flour (bread flour gives better texture)
1 1/2 tsps salt
Prepare your sourdough starter: If your starter has been in the refrigerator, let it warm up on the counter for an hour or two. Feed your starter daily for 2-3 days. It should be active and full of bubbles when you are ready to make your levain.
Make the levain: Mix the starter, flour, and water together making sure not to leave any dry pockets of flour. Cover and let sit on the counter overnight (~12 hours).
Prepare the dough: The levain is ready when it is bubbly and a little pea-sized dollop floats in water. Mix the levain and 1 cup (8 oz. or 235 ml) of water together in a large bowl until the levain is mostly dissolved. Stir in the flour to form a shaggy dough. Cover the bowl (I use plastic wrap because it is so arid here) and let the flour hydrate for 30 minutes to 4 hours (I do 4 hours). Mix the salt into the remaining 1 ounce (30 ml) of water and stir until all or most of the salt has dissolved. Pour the salt water over the rested dough and mix it in by hand, pinching and squeezing the dough until the liquid is completely incorporated and the dough is sticky.
Turn the dough: Facing your dough, grab the edge of the dough farthest from you, pull it up and toward you and tuck it down over the edge of the dough closest to you. Rotate your bowl 90 degrees (clockwise or counterclockwise is fine, just be consistent throughout) and repeat. Continue to do this until you return to your starting point (or have folded the dough 4 times). That is one turn. Let the dough rest covered for 30 minutes. Repeat for a total of 6 turns. After the the 6th turn, allow the dough to rest for 30-60 minutes (I rest for 60 minutes). The dough should be larger, but it won’t be doubled in size. As you turn and rest the dough, it should also become more cohesive and elastic and smooth.
Shape the dough: Turn the dough out onto a floured work surface. For a single loaf, you don’t need to divide the dough, but if you doubled this recipe, cut the dough in half. Sprinkle flour over the dough. Slide the flat end of a pastry scraper under one side of the dough and slide it counterclockwise in an arc to shape the dough into a rough round. Continue to do this until the dough is roughly a round blob. Let the dough rest for 20-30 minutes. Dust your proofing basket linen or the basket itself with plenty of flour. [If your basket linen is new, rub plenty of flour into the bottom and sides of the linen.] Sprinkle flour over the dough. Flip the dough over and grab the top edge and pull it up and over to the center of the dough. Turn the dough 90 degrees and repeat until all four edges have been pulled to the center. Turn the dough right-side up, dust with flour, then tip the loaf into your proofing basket upside down (the seams should be facing you). Dust the loaf with flour.
Proof the dough: Cover the basket loosely with plastic and allow to rise for 3-4 hours at room temperature or place the basket in a clean plastic bag or large (like 2 gallon) ziploc, tie or seal off, and rise in the refrigerator overnight for 12-15 hours.
Bake: Make sure your Dutch oven is wide enough to accommodate your dough. Place the Dutch oven with the lid in your oven. Preheat 500°F. I give the Dutch oven another 20-30 minutes in the oven once temperature is reached. Lay a sheet of parchment paper (NOT WAX PAPER) that is several inches bigger than your dough footprint on a cutting board. Tip your dough out of the basket, seam side down, onto the center of the parchment paper. If you proofed your dough overnight, you can go straight from the refrigerator to the parchment. Score your loaf at a shallow angle (the blade should be as close to parallel to the dough surface as possible) with a sharp knife or a lame. Move the board-parchment-dough ensemble next to your oven. Take the Dutch oven out of the oven, remove the lid, grab the edges of the parchment paper (making sure not to lose your dough) and quickly but CAREFULLY lower the dough and parchment into the Dutch oven. Cover with the lid and return to the oven. Bake 20 minutes. Reduce oven temperature to 450°F. Bake 10 minutes. Remove the lid. Bake for another 15-25 minutes until the crust is dark golden. Remove the bread from the Dutch oven with a spatula and allow to cool completely on a cooling rack before slicing. Makes one 1-pound loaf.

more goodness from the use real butter archives

|
brioche |

|
tender potato bread (db) |

|
sweet potato rolls |

|
hot buttered pretzels |

February 13th, 2018 at 1:36 pm
Dear Jen! Thank you for this lovely guide and in-depth explanation of how to make my own sour-dough bread. It looks lovely and I could almost smell the freshly baked loaf.
While it seems a fairly straightforward process, it is rather time-consuming and don’t really feasible for every-day home use. But I’m certainly going to try this when I have some time off! Thanks again!
February 13th, 2018 at 5:26 pm
This sounds amazing! My best friends are from southern Cali and all they talk about is how great the sourdough is. That isn’t exactly a specialty here in Georgia. Did you prefer the one using AP flour or bread flour? I can’t wait for this adventure!
Suzan
February 13th, 2018 at 11:38 pm
Thanks for sharing this. I had an adventure creating my own starter and baking bread using the same adapted Tartine method a couple of years back. We ended up eating many more servings of bread and pancakes than usual to keep up with the starter so ultimately suspended the project, but it was rewarding to create such delicious and beautiful loaves of bread.
A few months after I stopped baking my own loaves, this piece, written by an intern working at a local farm, really spoke to me: http://fullbellyfarm.com/news-farm-july-24-2017/. I think you, your friend Dawn, and others may enjoy it, too.
February 14th, 2018 at 9:04 am
Beautiful!!! We used to do this for our weekly loaf of sandwich bread, when we both packed a lunch. Sweet memories. May have to start this up again! Happy Valentine’s Day! xoxo jill and tom
February 14th, 2018 at 9:39 am
Caramelia – Yes, I think the bread baking is probably best reserved for a day when you have time (maybe a weekend). But mixing the levain can be done the night before and the actual baking only requires about an hour the day after (if you decide to proof overnight in the refrigerator).
Suzan – I definitely prefer the bread flour. It gives better texture and chew on the inside, and a nicer crisp crust and the dough is easier to work with!
Barbara – I’m actually very familiar with overproducing food in my kitchen! :) I give the excess to my neighbors and friends (my neighbors LOVE the steady stream of breads, cookies, cakes, pastries, candies). Also, I have a chest freezer, so freezing bread is also an option (especially when I don’t want to bake in summer!). But when I want to cut back on the baking, I just refrigerate the starter and feed it once a week until I’m ready to bake again. I’m loathe to waste food, so that’s why I was worried about taking on a sourdough starter at first. Now that I know how to manage it, I’ve found a good groove :)
Jill – Let me know if you need some starter! :) xo
February 14th, 2018 at 12:58 pm
Please look up Puratos in Belgium. The geek in all of us will love it! They are keeping starters from all over the world and looking at their unique profile. It is AMAZING I can’t believe your kitchen knife was able to score that!
February 14th, 2018 at 4:21 pm
I have had a sourdough starter for 43 years! It lives in my refrigerator and thrives on neglect. I will leave it alone for months at a time. It forms an alcohol layer on the top. When I want to use it I feed it, and stir it and it comes to life! I use mine for biscuits. They are the best. Would love to try sourdough bread. Jen you are an inspiration.
But don’t throw out your sourdough if you don’t use it every week. Leave it alone and then resurrect it want you want it.
February 15th, 2018 at 4:32 am
Thanks a lot for this. I’ll print it and read more thoroughly before beginning. I’ve always wanted to make my own sourdough (and starter), but it does seem a little intimidating. But you are right, there is this incredible satisfying feeling of making your own perfect piece of loaf.
February 16th, 2018 at 7:34 am
Hummm, I tried starter once and failed miserably. You’ve given me the courage to try, try again. Thanks, your bread looks awesome.
February 22nd, 2018 at 8:43 am
Great guide! I’m really curious how you fit all these steps into your normal day. Would love to see a “schedule” or “day in the life of a sourdough starter” type post or add-on regarding what time of day you start the process, when there can be a break in the process and when you end up baking. Keep up the wonderful content!
February 23rd, 2018 at 8:57 am
Marissa – How cool! The kitchen knife worked, but I’ve since acquired a lame which definitely has an easier time of scoring.
Jill from Michigan – I generally use the discard to bake other things, but yes, I keep mine in the fridge more often than on my counter!
Stine Mari – Good luck! I hope you make it sooner than later :)
farmerpam – Do it, lady!! xoxo
Maggie – I usually make the levain the night before, then I allow for a 4 hour autolyse in the morning (it allows me to get out for a workout) and then the turns in the afternoon while I’m working on the computer. Then I pop it into the refrigerator for the cold proof and bake the next morning. But you can reduce the amount of time involved if you shorten the autolyse step to 30 minutes and proof at room temperature for a few hours before baking instead of the overnight proof. I just like the flavor of the cold proofing as well as the big break it allows me!
March 25th, 2018 at 1:17 pm
What if you don’t have a sourdough starter? Is that something you can make yourself?
March 25th, 2018 at 5:38 pm
Mary – Since I was given my sourdough starter, I don’t know how you make one (I have an idea, but I haven’t actually done it). However, I googled “how to make a sourdough starter” and there are lots of great links that come up from The Kitchn, King Arthur Flour, The Splendid Table, etc. I think any one of those links will give you good information and have you making your own starter like a pro!
October 20th, 2019 at 6:28 am
We live at altitude of 5,500 feet above sea level. Any adjustments to the recipe?
Thanks
Dan
October 20th, 2019 at 7:54 am
Dan – I didn’t actually make adjustments to the recipe for my altitude, so I think you should be fine!
February 9th, 2020 at 5:22 pm
Jen,
What do you store your starter in and what are your recommended tools for bread baking?
February 9th, 2020 at 7:20 pm
Andrea – I store my starter in a weck jar and keep it sealed with their Keep Fresh plastic lid. I prefer the straight sided jars that taper a little at the bottom for ease of cleaning and scraping. For the bread baking I do, the special tools used include: pastry scraper, Danish dough whisk, kitchen scale, banneton, large ziploc bags (2-gallon), parchment paper, razor blade for scoring, spray bottle (misting the dough before baking), Dutch oven. Hope that helps!
March 29th, 2020 at 5:56 pm
Jen – have been following you for years but never commented. This recipe for me has been so successful down here in Denver. Learned so much. In this pandemic situation, I have been sharing starter and your recipe hoping that folk down here in Denver who cannot find yeast can bake bread and share among our neighborhoods. So thank you. I hope you are well. Sincerely and with great affection. Jane
March 31st, 2020 at 8:05 pm
Jane – I’m really happy to read this and hope very much that you and all of your neighbors and friends are healthy and well. Sending love and sourdough <3 xoxo
August 21st, 2020 at 8:32 am
Hello, Jen, I’m another one who’s followed your excellent work for years. This recipe, made into a bâtard, has been a great success — until now. The one I pulled from the oven today had practically no oven spring. The starter was very active, yet the levain didn’t bubble as much as usual,. Still, the dough seemed nice and elastic after its 4-hour autolyse. The only difference was that I put the dough in the oven with the light on (75° or so as opposed to 73° kitchen) between folds, and I can’t imagine that was a negative. Should I have left my levain longer than its 14 hours? Or maybe let it rise in that oven with the light on?
Thanks for any advice and wishing you the best of health, Janet
August 21st, 2020 at 9:07 am
Janet – Hi there. Hmmm, based on what you’ve described, it’s possible that the levain might have been quite active (as it is summer and the temperatures are warmer) and became flat? Did it pass the float test? The elasticity has to do with the gluten development more than the wild yeast activity, so I’m guessing the levain went too long. Did it proof as well as past attempts?
August 25th, 2020 at 5:44 am
I think you’re right, it’s a question of time/temperature. This time I left the levain on the counter rather than in the oven and it was nice and bubbly after 14 hours and had doubled in size.
I made another change, autolysing the flour and water without levain for an hour and then with levain for another hour, for a bulk fermentation two hours shorter than usual. (having read that flat bread also could be caused by over fermentation). Regular s&f and refrigeration, and the loaf came out very nicely. Thanks so much for your response, and compliments on your great cooking and photography.
Janet
December 15th, 2020 at 12:07 pm
Janet – Thanks for the followup and I’m glad you had success AND great sourdough :) xo